Set-up guide AED Monitor
Step 1: Install AED Monitor App
Go to the Google Play Store on your mobile phone. You can find Play Store on your phone: 
Search for “AED monitor” in the Play Store and install the app (Android only)
AED Monitor: 
Step 2: Register as a user
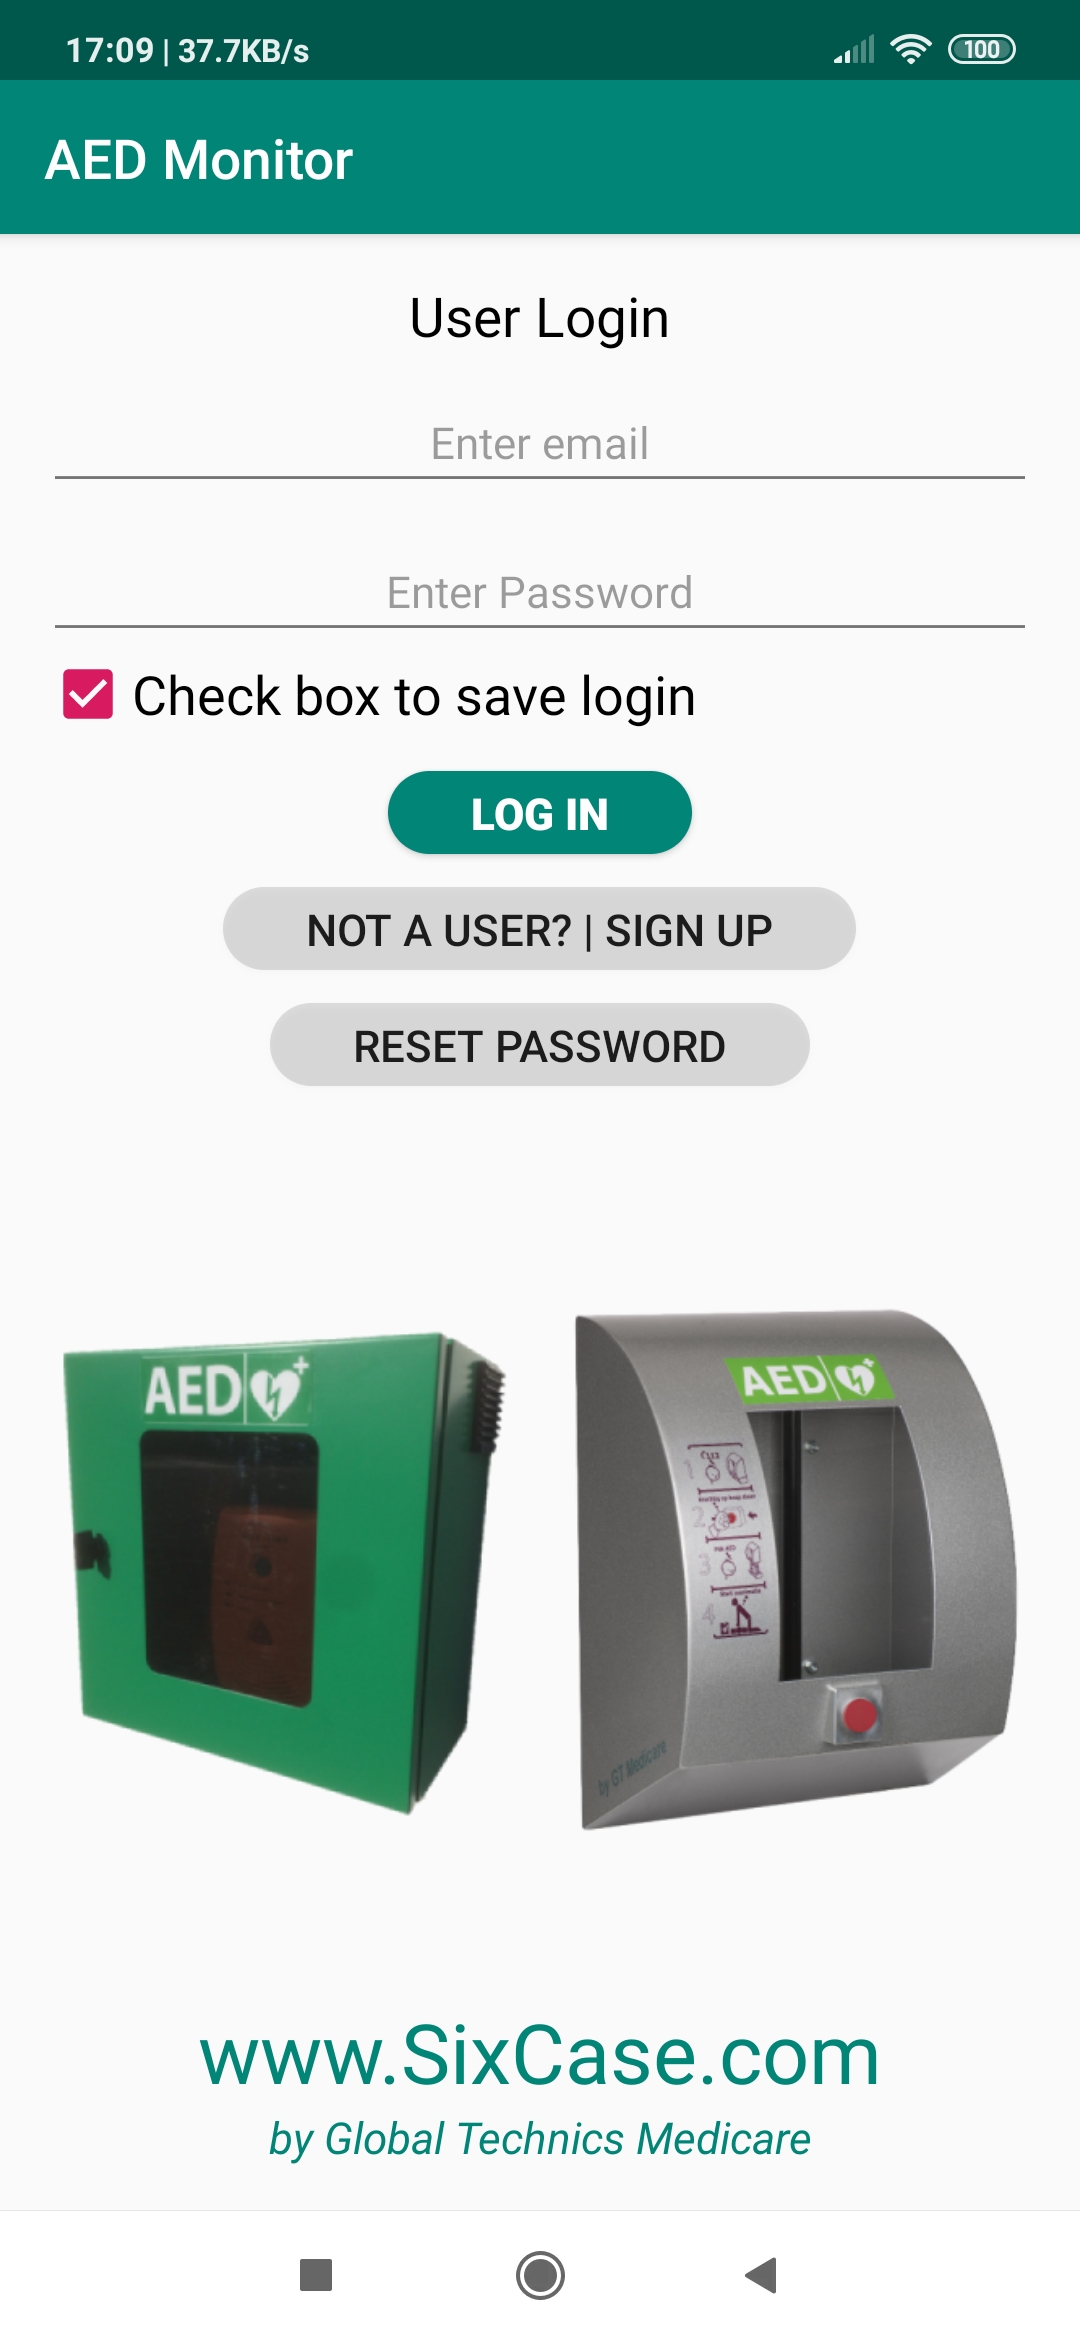
Open the app “AED Monitor” and press button “NOT A USER? | SIGN UP”
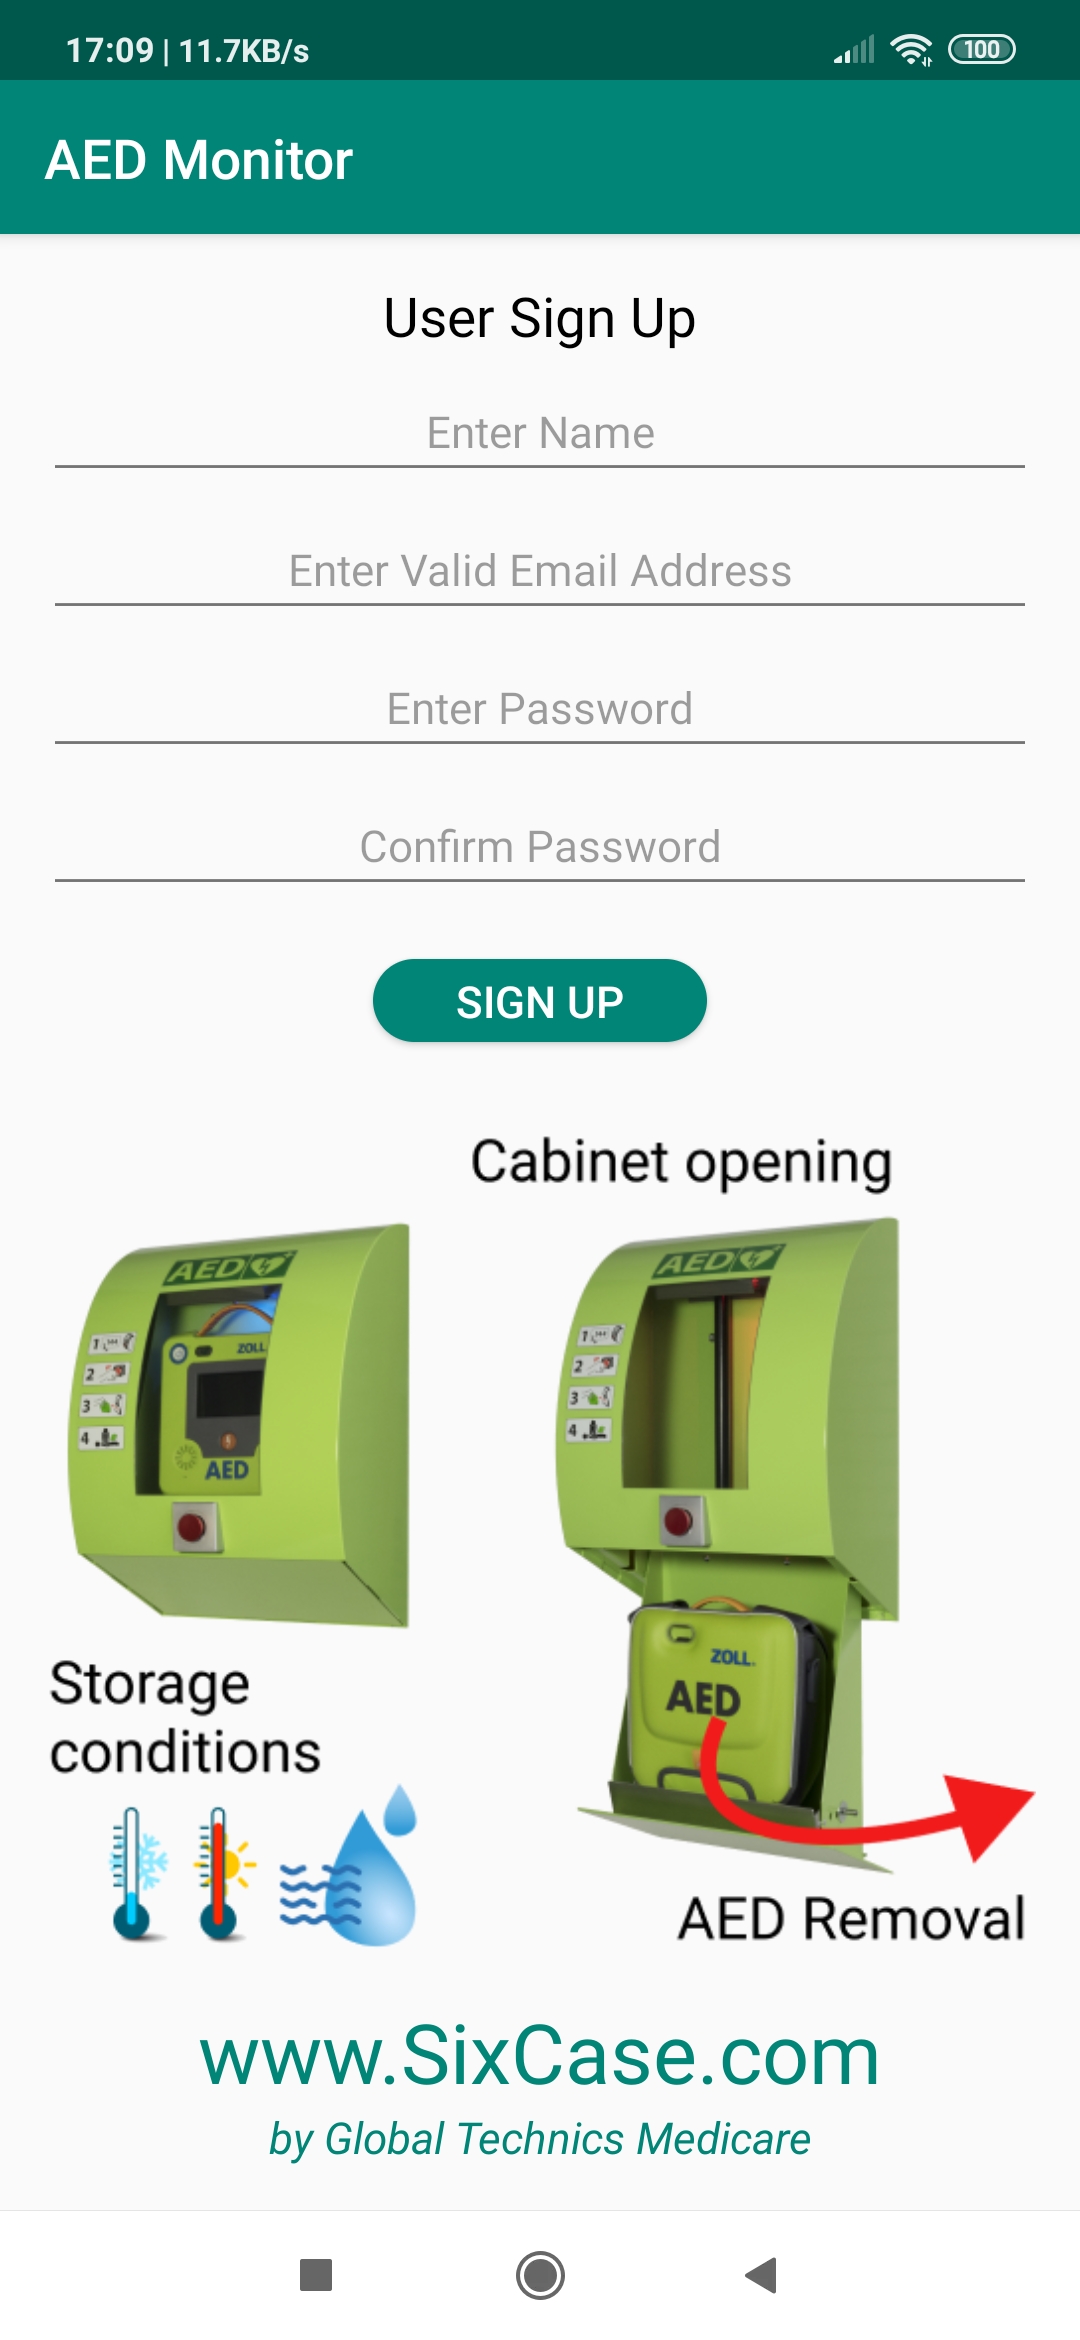
After you have filled in the different fields, click on "SIGN UP". You will be asked to provide your “role” in a pop-up screen. There are 3 roles possible:
- First responder The role of the first responder is to locate any AED close to him/her and use it in case of an cardiac arrest / heart failure. He/she has access to all AED locations that are available in the database. There is no (need for) access to the detailed (historic) AED data, such as temperature or pad / battery expirations dates and such. The first responder will be the “user” of the AED and will also not receive any warnings from the server..
- AED administrator The role of the AED administrator is to control and maintain the AEDs under his/her responsibility. Therefore, access is provided to all AEDs under his/her responsibility and all detailed AED data, such as maintenance information, availability of the AED, (historic) temperature/humidity data, (warning) messages. You would select this role when you (are about to) install AED monitoring device in AED cabinets.
- Distributor (of AED monitoring systems) The role of distributor is to configure and register the product needs of all AED administrators that have purchased an AED monitoring device, AED cabinets and AEDs. This will facilitate the ordering of the correct AED consumables such as pads and batteries. Also, the general status and performance of the AED cabinets of its customers can be monitored.
Select the applicable role and continue. You can always change your role later in the “Settings” of the AED Monitor app.
After all relevant information has been provided, a confirmation email will be sent to the provided email address. Open your email and confirm your registration by clicking the link in the email.
Important: You email address needs to be a valid email address: a confirmation email will be sent to this address. This email address will be used as your user ID. All your AED monitoring devices will be linked to this email address.
After you have registered, you can always login, using the provided email address and password. Tip: Check the box “Check box to save login” on the login screen to save your credentials and automatically login next time.
Step 3: Install AED monitoring device
Hardware Installation
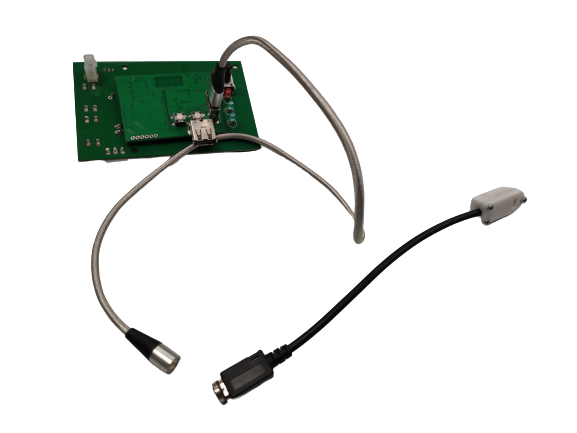
GeneralThe AED Monitor add-on board is a small board that is connected to the existing basic board.
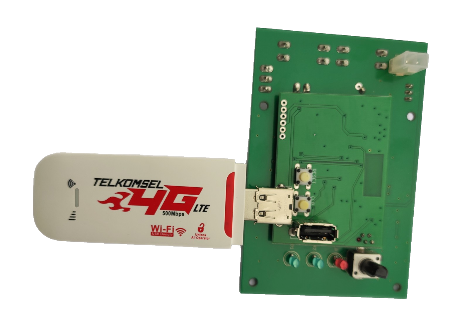
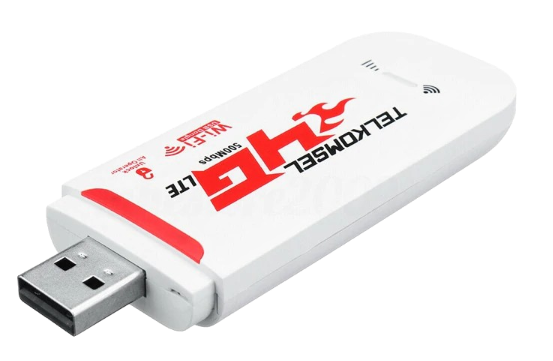
An optional USB GSM router can be connected to the board to make use of local available GSM networks (SIM card required)
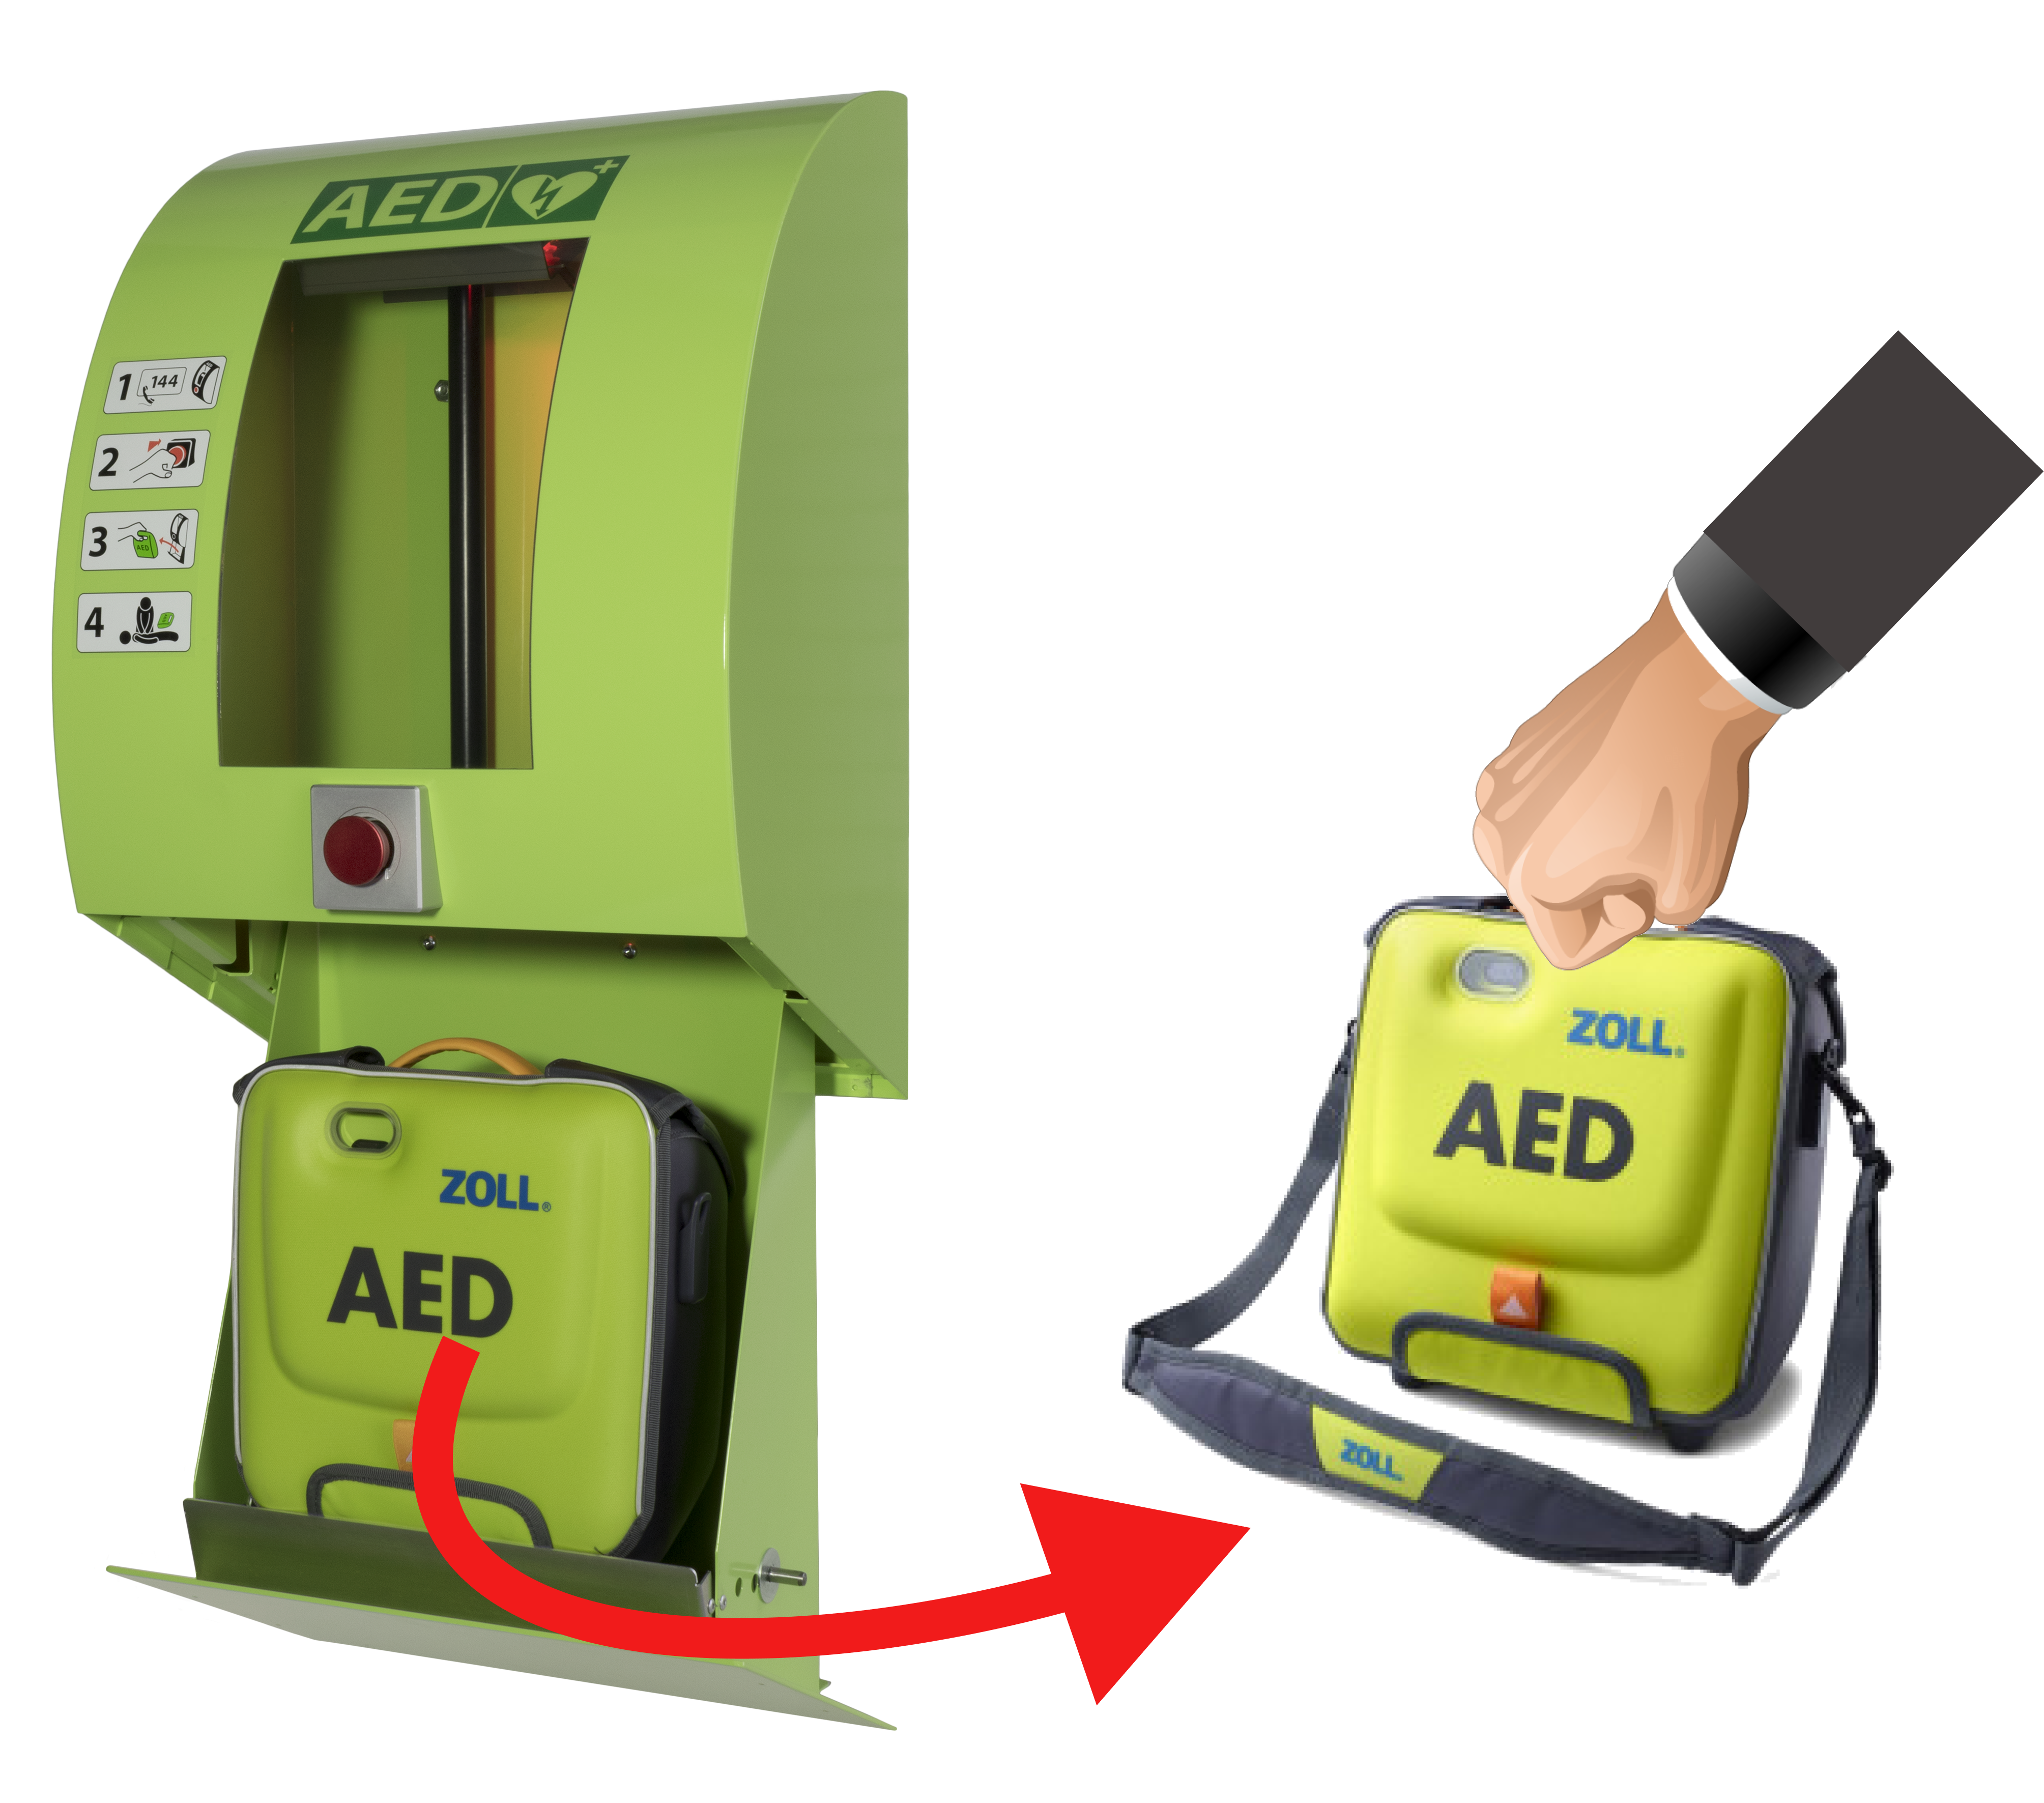
The AED Monitor is equipped with a Temperature and Humidity sensor, which also serves as a sensor to detect if the AED is present in the cabinet. This sensor must be connected to the add-on board through the USB connector. A magnetic intermediate connector assures that the sensor or add-on board cannot be damaged when the AED is removed.
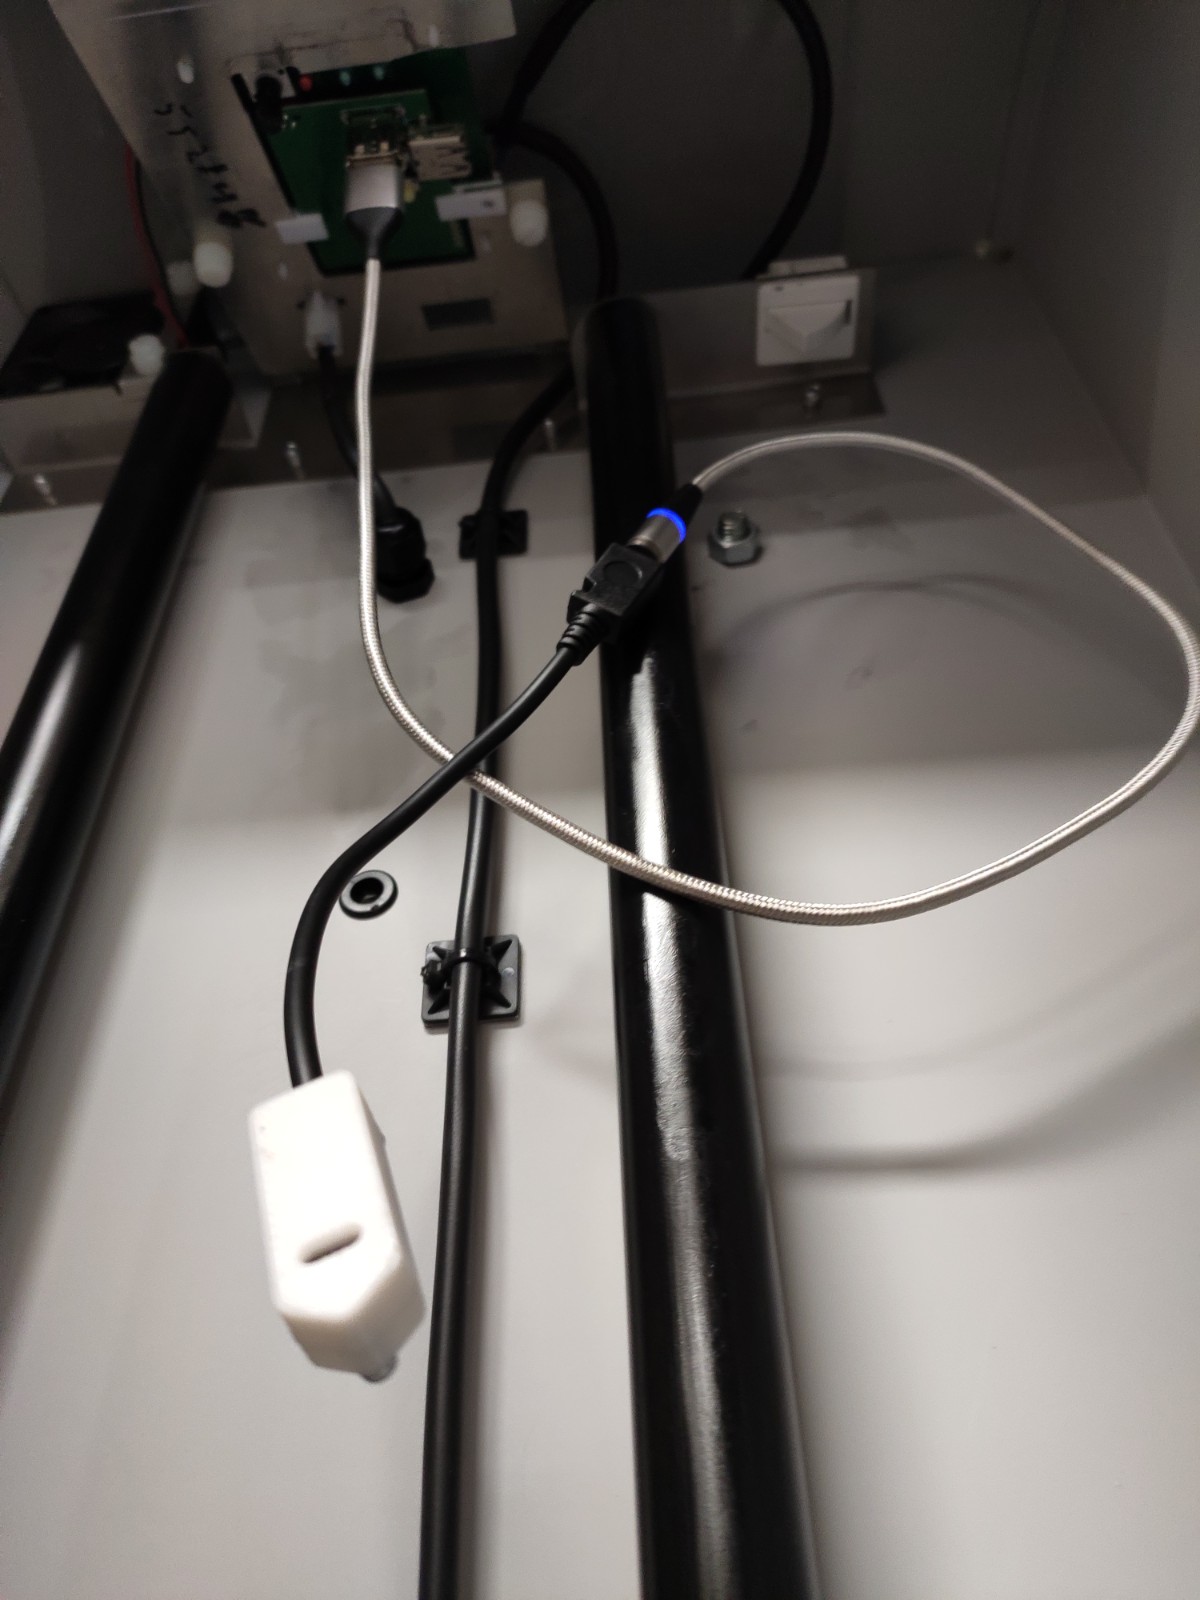
Important: we advise to put the sensor on the front of the AED (inside the bag if present or otherwise next to the pads) to provide relevant temperature data. Do not put the sensor directly on the heating element of the cabinet, this will give misleading temperature readings
Connecting the device to the internetThe AED Monitoring device needs to be connected to internet. This can be done in 2 ways:
- Connection to a nearby WiFi router that is connected to internet Make sure that you AED cabinet is within the range of the WIFI router and you have the router SSID and password available when you are registering your device. If necessary, place a WIFI repeater close to the AED cabinet. With this method, no GSM router or SIM card is required.
- Through the GSM network When you want to use the GSM network for internet connection, you have to insert a SIM card into the GSM router with a valid data bundle. When the GSM router (+ SIM card) is inserted in the USB port, it functions as a WiFi router and connects to the internet through a GSM (3G or 4G) connection. Important: disable any pincode on the SIM card. This will prevent a GSM connection at start up of the GSM modem. For more details on how to set up the GSM WiFi router, see Setting up the GSM WiFi router
Step 4: Connect the AED monitoring device to the WIFI router/internet
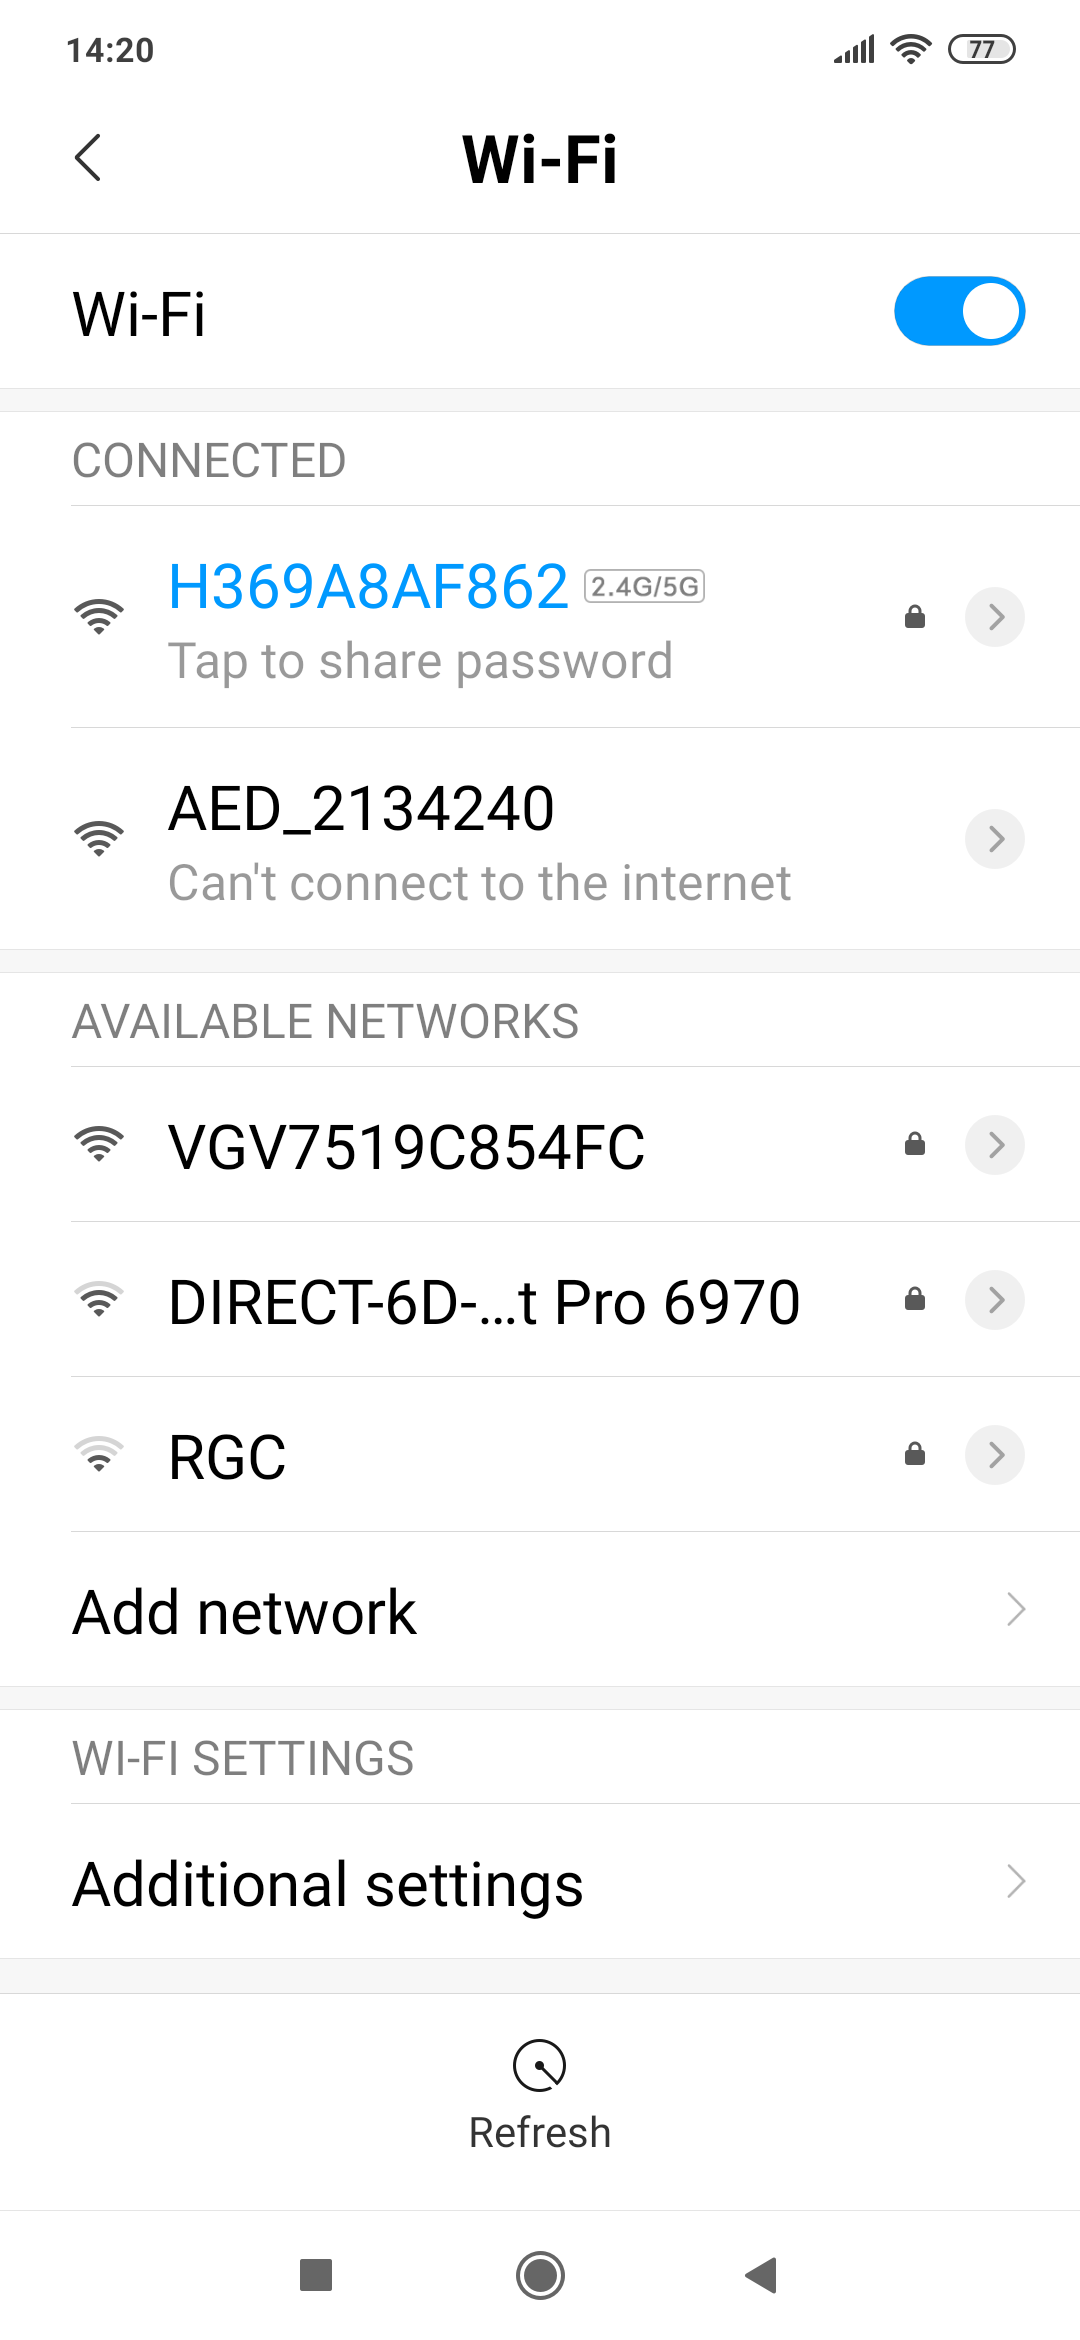
Each AED Monitoring device has a unique identifier that will show up when connecting to a WIFI network. It looks something like: AED_2134240 (the numbers will be different for each device). It also has a unique validation code, which is required if you want to register the AED manually. The identifier and validation code are printed the manual provided in the delivery. The device will monitor the status of the cabinet (open/closed) and the status of the AED (present/removed). It will also continuously measure the temperature and relative humidity inside the cabinet. You will be able to access and monitor these data from your mobile phone from the app “AED Monitor”. Also, you have the option to receive warnings when the cabinet is opened, the AED is removed from the cabinet or the temperature/humidity are outside acceptable limits (required to store the AED).After the power is on, the device will locate all WIFI routers that are within range and make itself visible by displaying the unique AED identifier (AED_2134240 or similar) on the WIFI screen of your mobile phone. To connect the device to the internet, you need to provide the SSID and password of the WIFI signal in range. To do this, go to the WIFI settings on your mobile phone and search for the device identifier (first screen). Click on the device and wait until the second screen pops up (be patient, it can take a while before the second screen appears). Press button “Configure WIFI” and the third screen will appear:

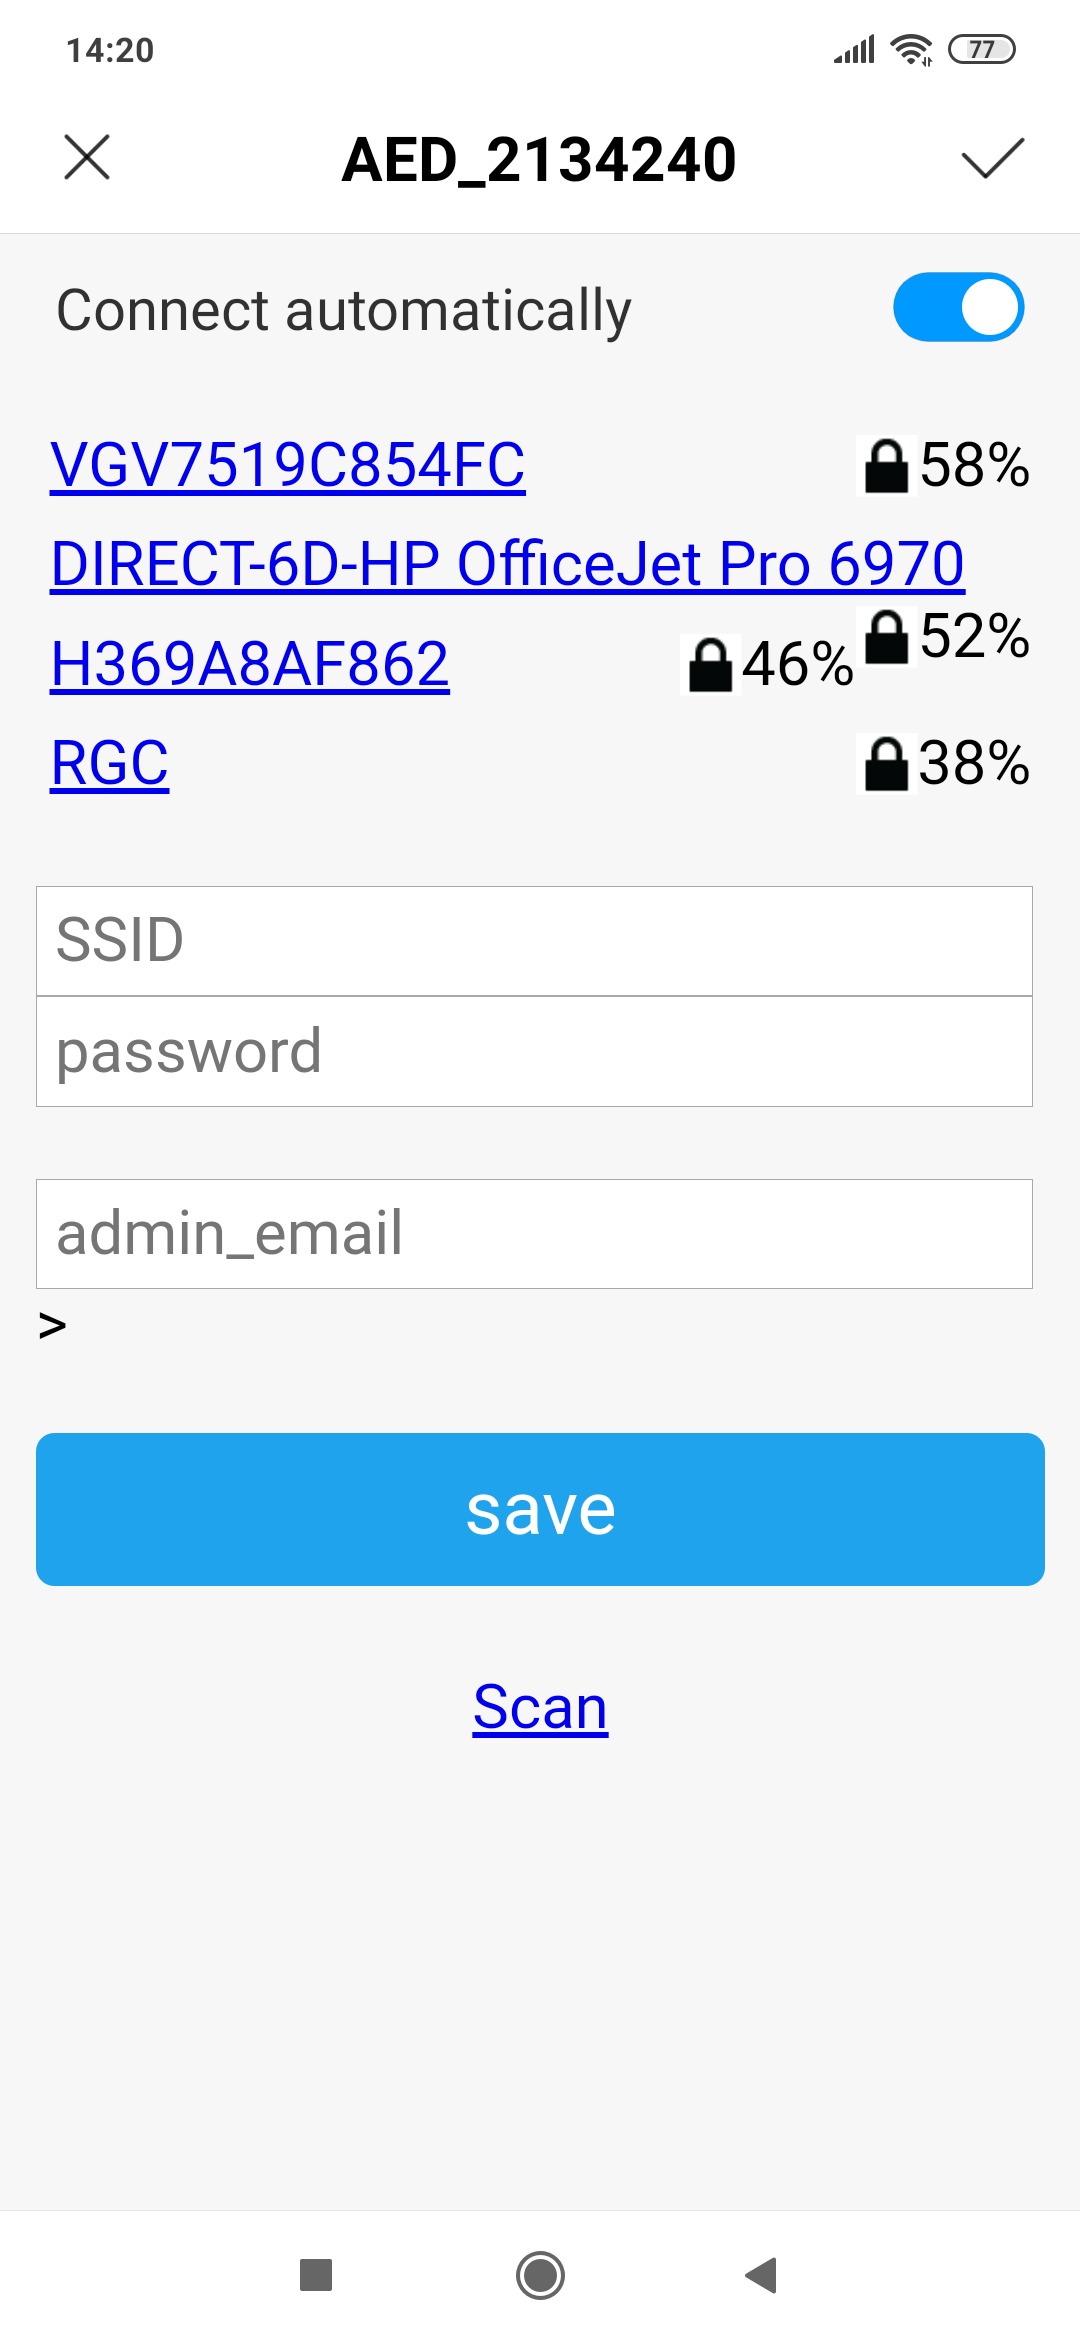
If you are using a GSM/WiFi router to connect to the internet, use the WiFi SSID of this router. If you have purchased the recommended router with your AED monitoring device, the SSID looks like "4G_UFI_XXX" and the default password is "1234567890". We advice you to change the WiFi password of the router: see section Setting up the GSM WiFi router
Select the correct WiFi network (SSID) and enter the network password. Also enter the email address to which this device will be registered (same email as in step 1). Press button “SAVE” and you are done.
Important: provide the correct email address of the administrator (from step 1), otherwise the device will not be visible in the app.
Important: on some phones, the second screen may not occur automatically. If this is the case, please connect to the AED_XXXXX by using the phone's WIFI settings menu and follow the specific directions of your phone to connect to a WIFI SSID. The second screen should always be displayed to be able connect to the AED and register it. If the field with "admin_email" does not appear in the third screen, you should still register without it. In this case, please link your AED to the correct administrator by manual registration in the AED Monitor app: see "Method 2” below.
Trouble Shooting:
If you have entered the wrong SSID/password data, the device will remain visible on your phone's WiFi settings and you can repeat step 4.
If the AED_XXXXX is no longer visible or you experience any other problems, press the reset button on the device (see picture below).
If you have entered the wrong "admin_email" or you want to change it, you have to "Clear" the device (method 1) or register the AED manually in the AED Monitor app (method 2).
If you clear the device, you have to repeat the complete step 4.
If you only want to re-register your AED (assign it to another "admin_email"), it is easier to follow method 2.
Method 1: Clear the device
To clear the device, press the button “clr” on the side and then press the “rst” button.
Keep keep the “clr” button pressed for about 1 second when pressing the reset button.
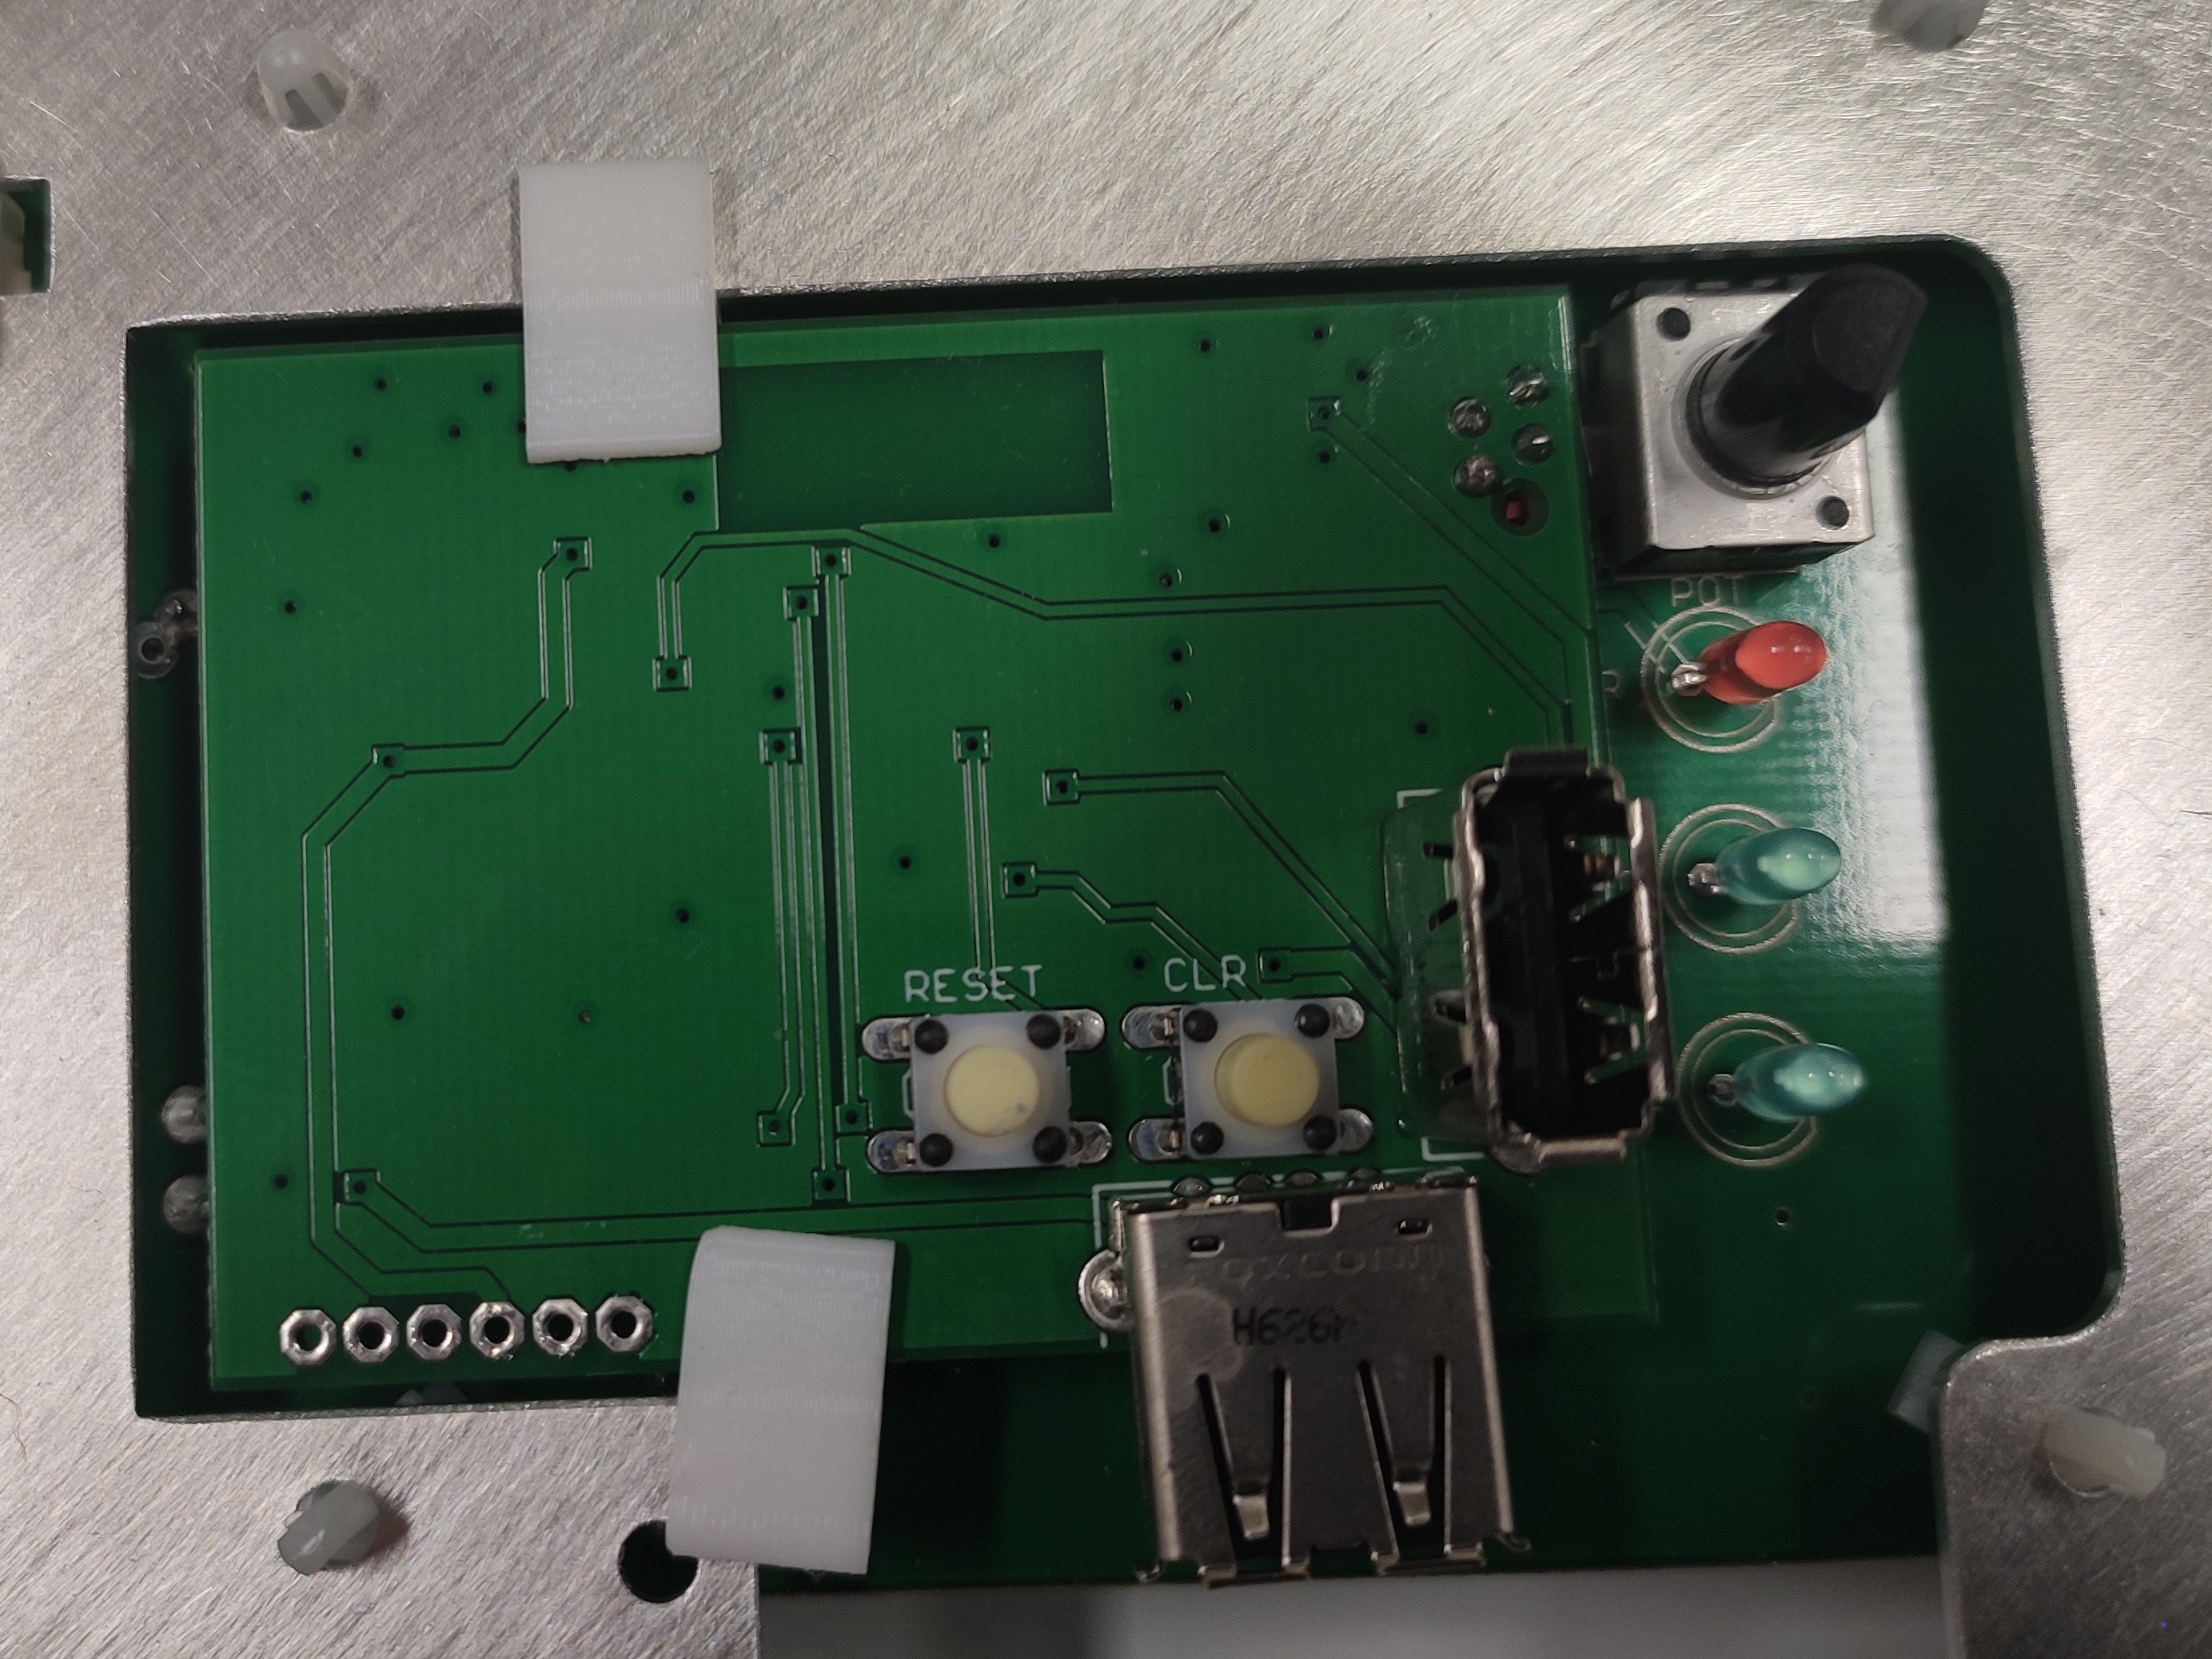
Now the device is completely reset and will be visible again on your mobile WiFi screen. You can start again with step 4. This step can be repeated at any point in time to change the administrator (email) of this device. Always make sure that the administrator (email) has signed up before registering the WiFi device. You can also re-assign the AED to another administrator in the AED Monitor app at any time:
Method 2: Register the AED in the “AED Monitor” app
You can always register your AED manually through the AED Monitor app.
Please make sure you have the AED identification number available (AED_XXXXX) as well as the validation code (6 number code).
You can find both codes on the information you received with the device.
Start the app and go to "register AED" in the dashboard screen  You will get the following screen:
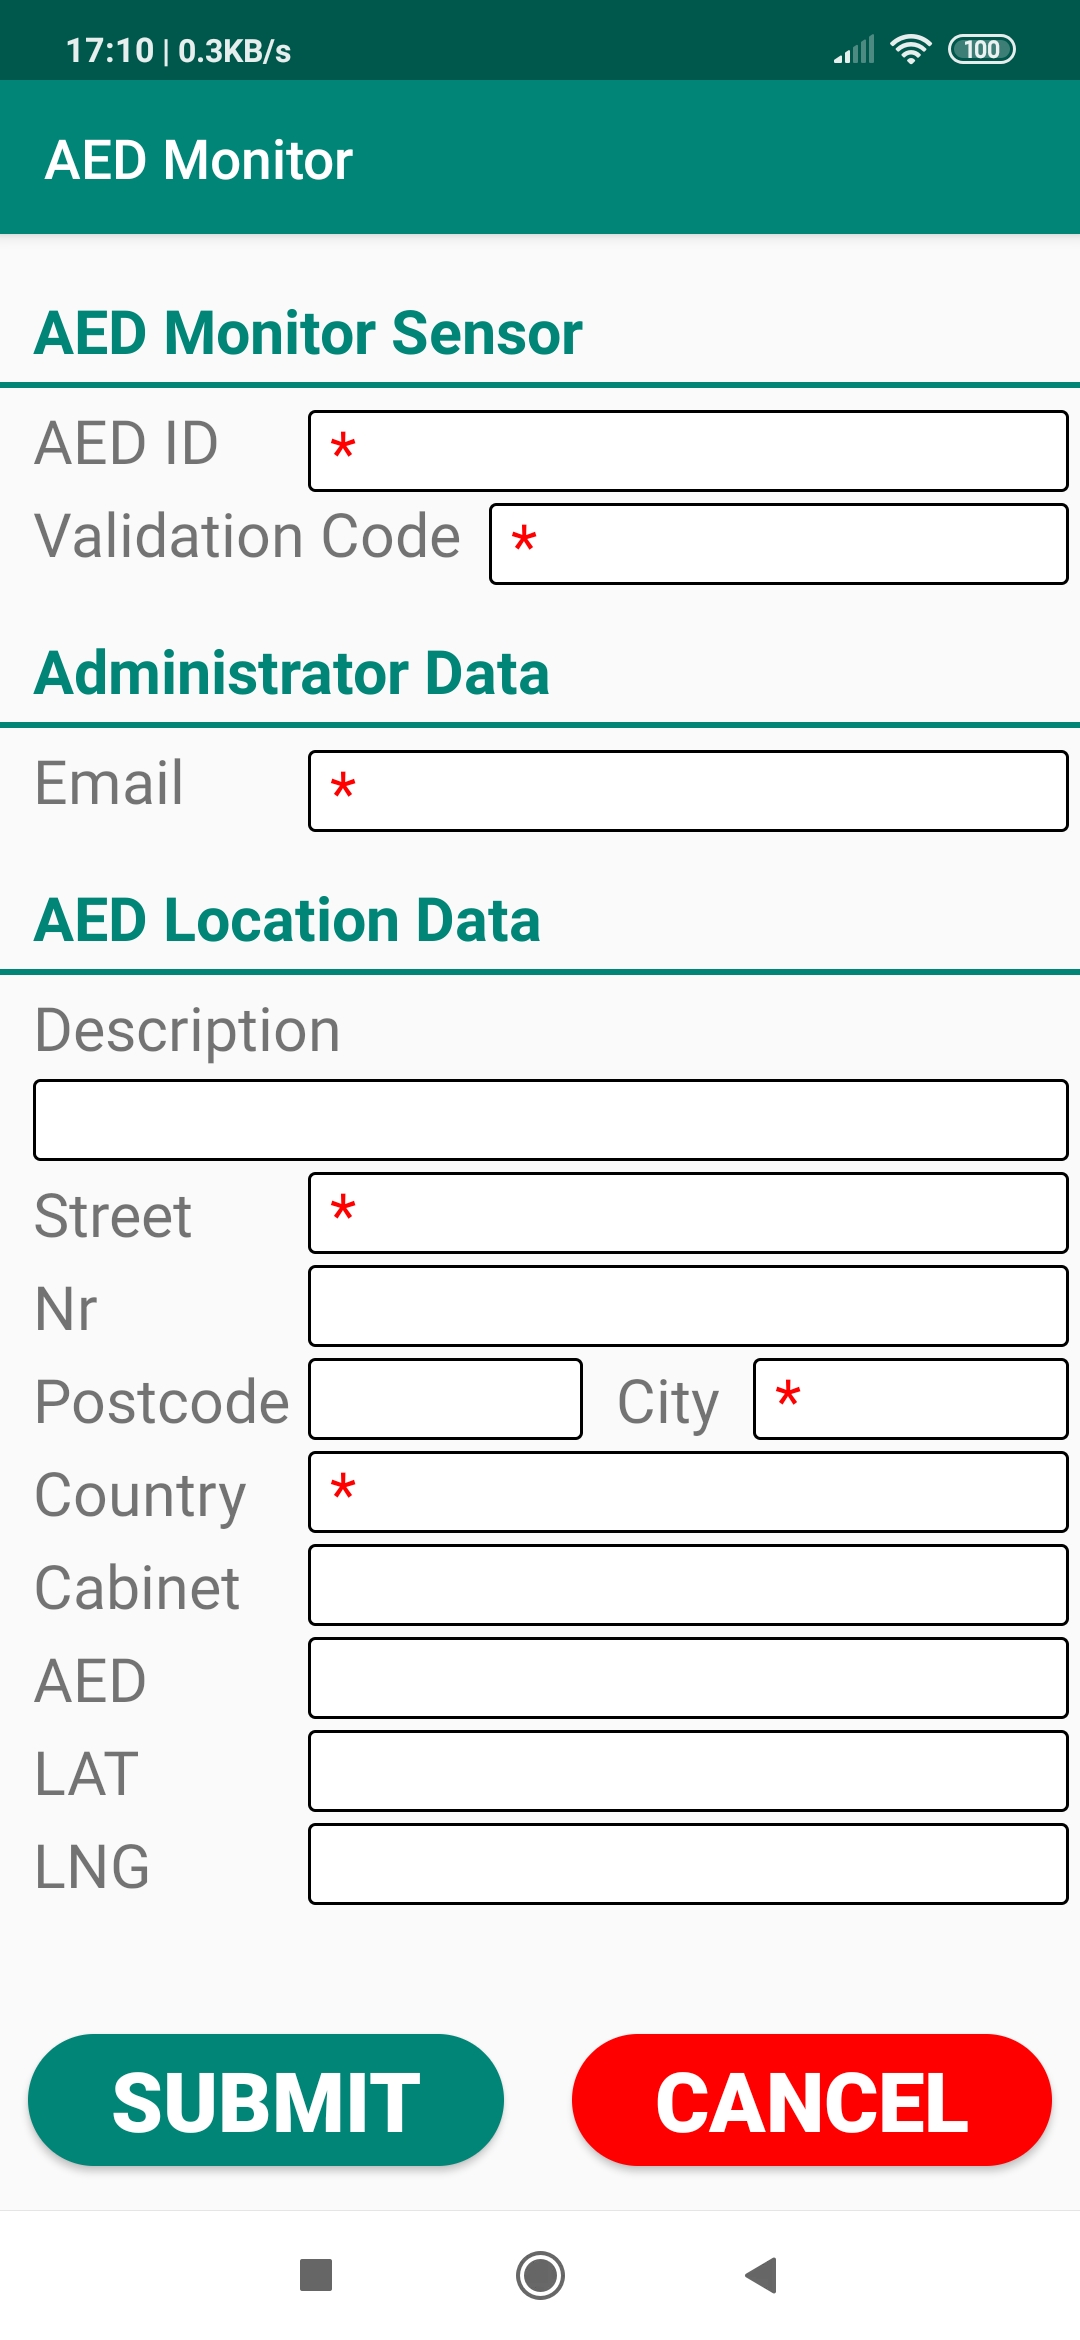
Fill in the mandatory fields (marked with *) and click on "SUBMIT"
Important: use the same email address as in step 1, otherwise the AED will not be visible in the app.
Step 5: Adding you newly registered device to your app
(You can skip this step if you have registered the AED manually in the app “AED Monitor”).
When step 4 has been completed successfully, you will get a pop-up when opening your AED Monitor app.
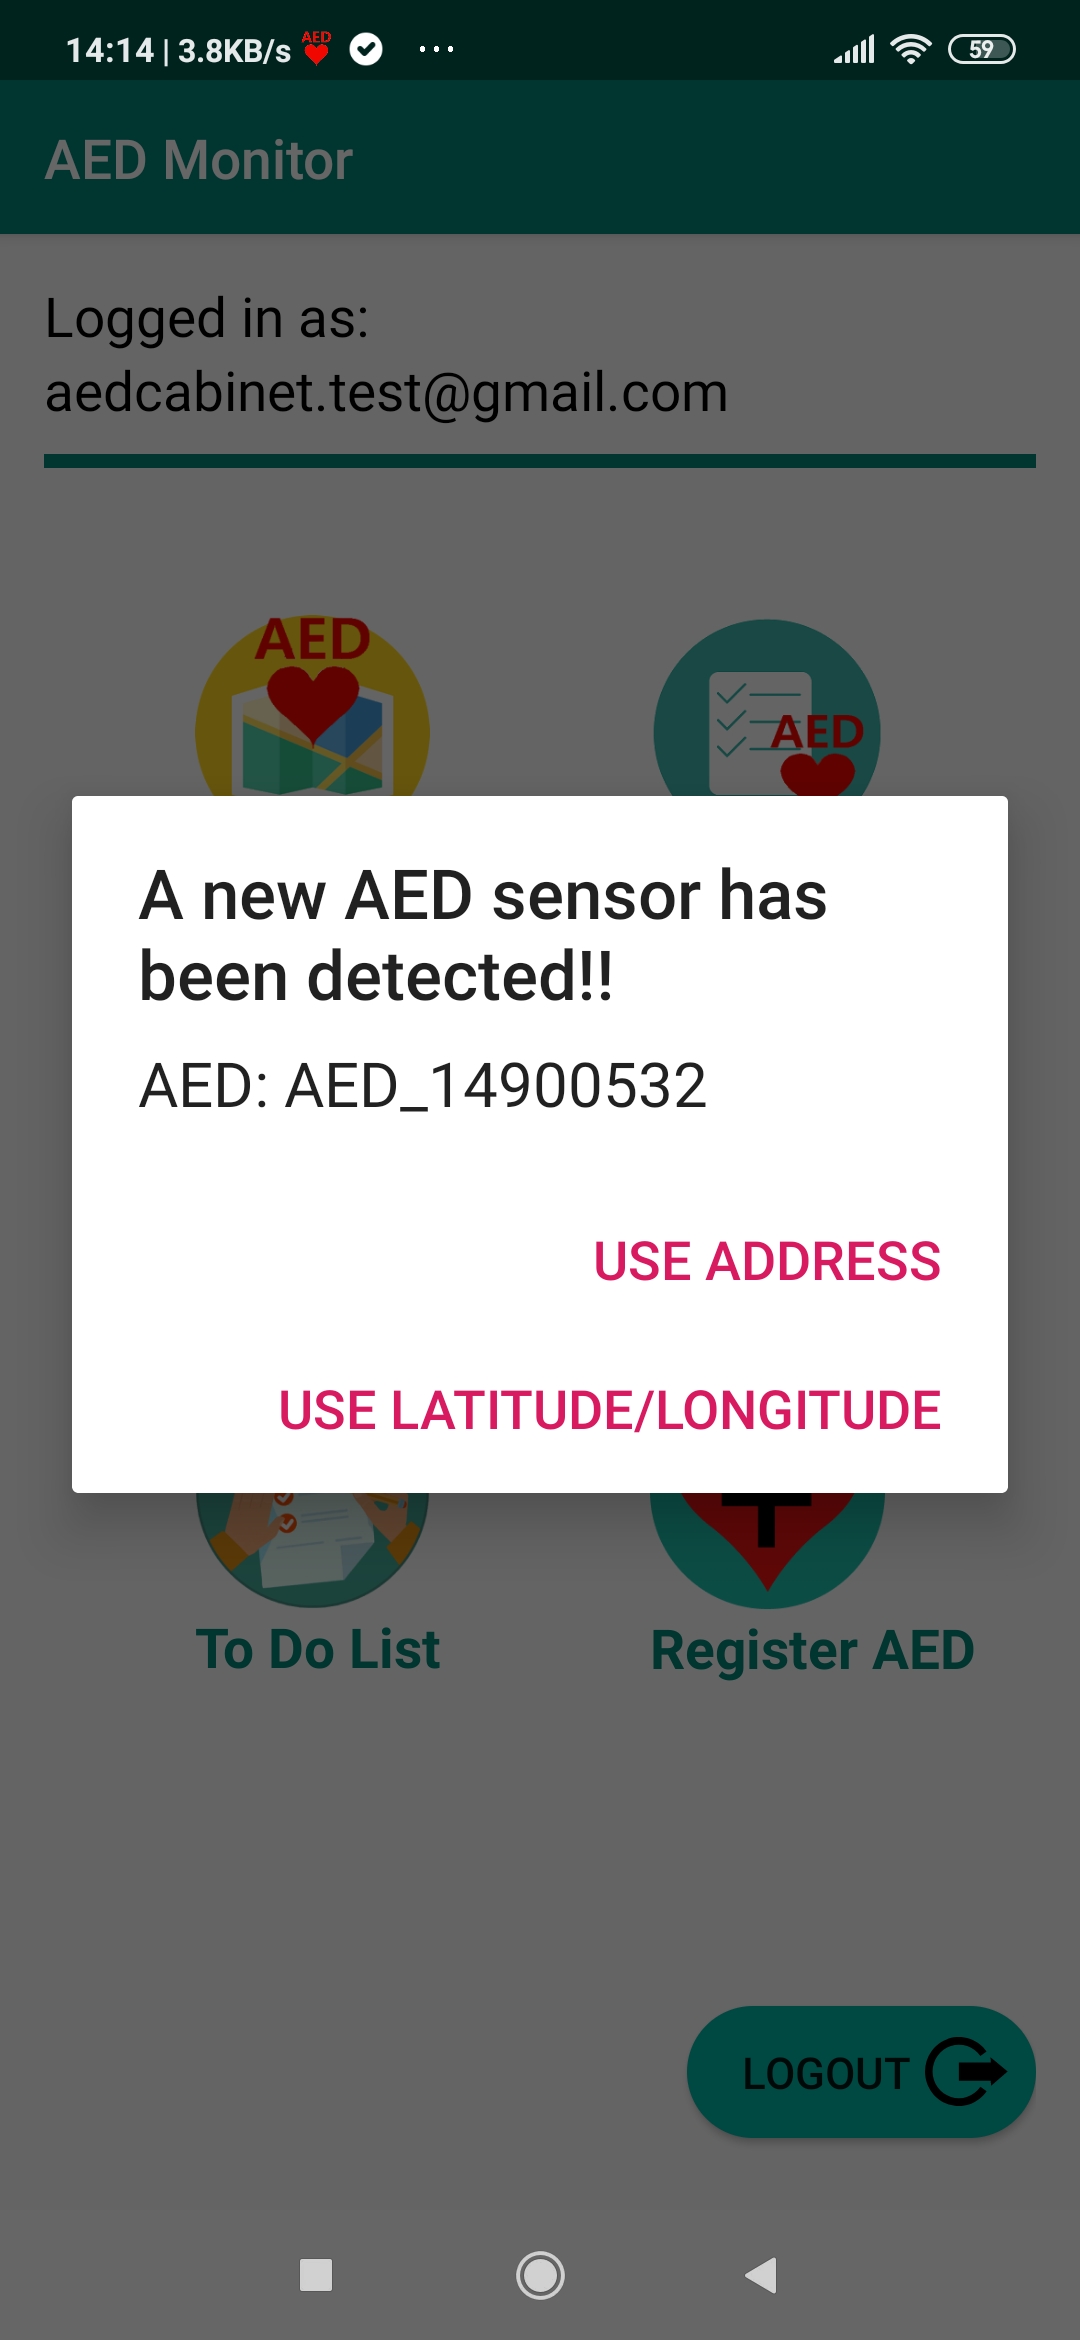
Depending on your selection, you will see 1 of the 2 following screens:
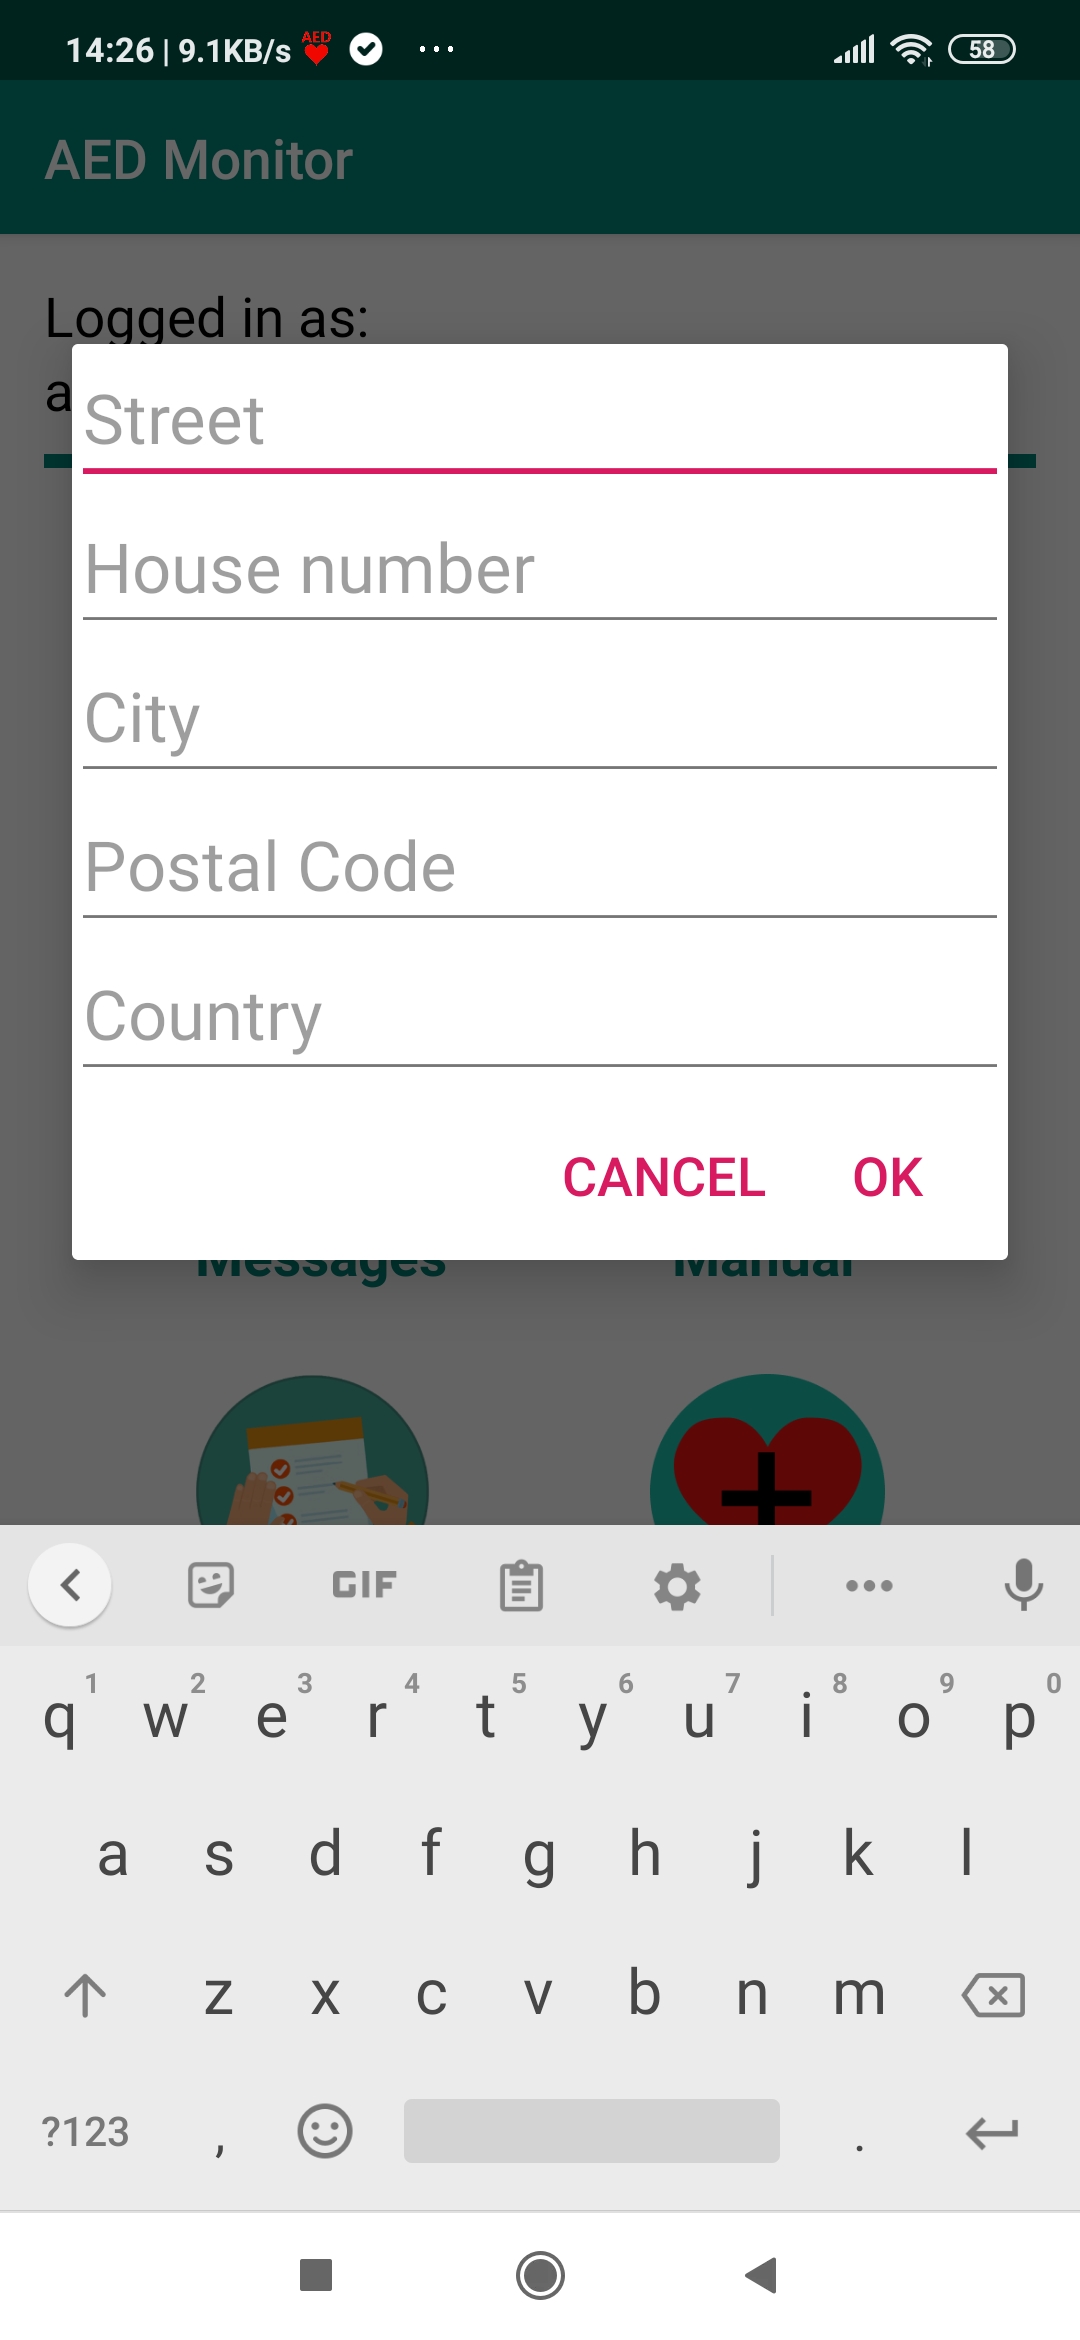
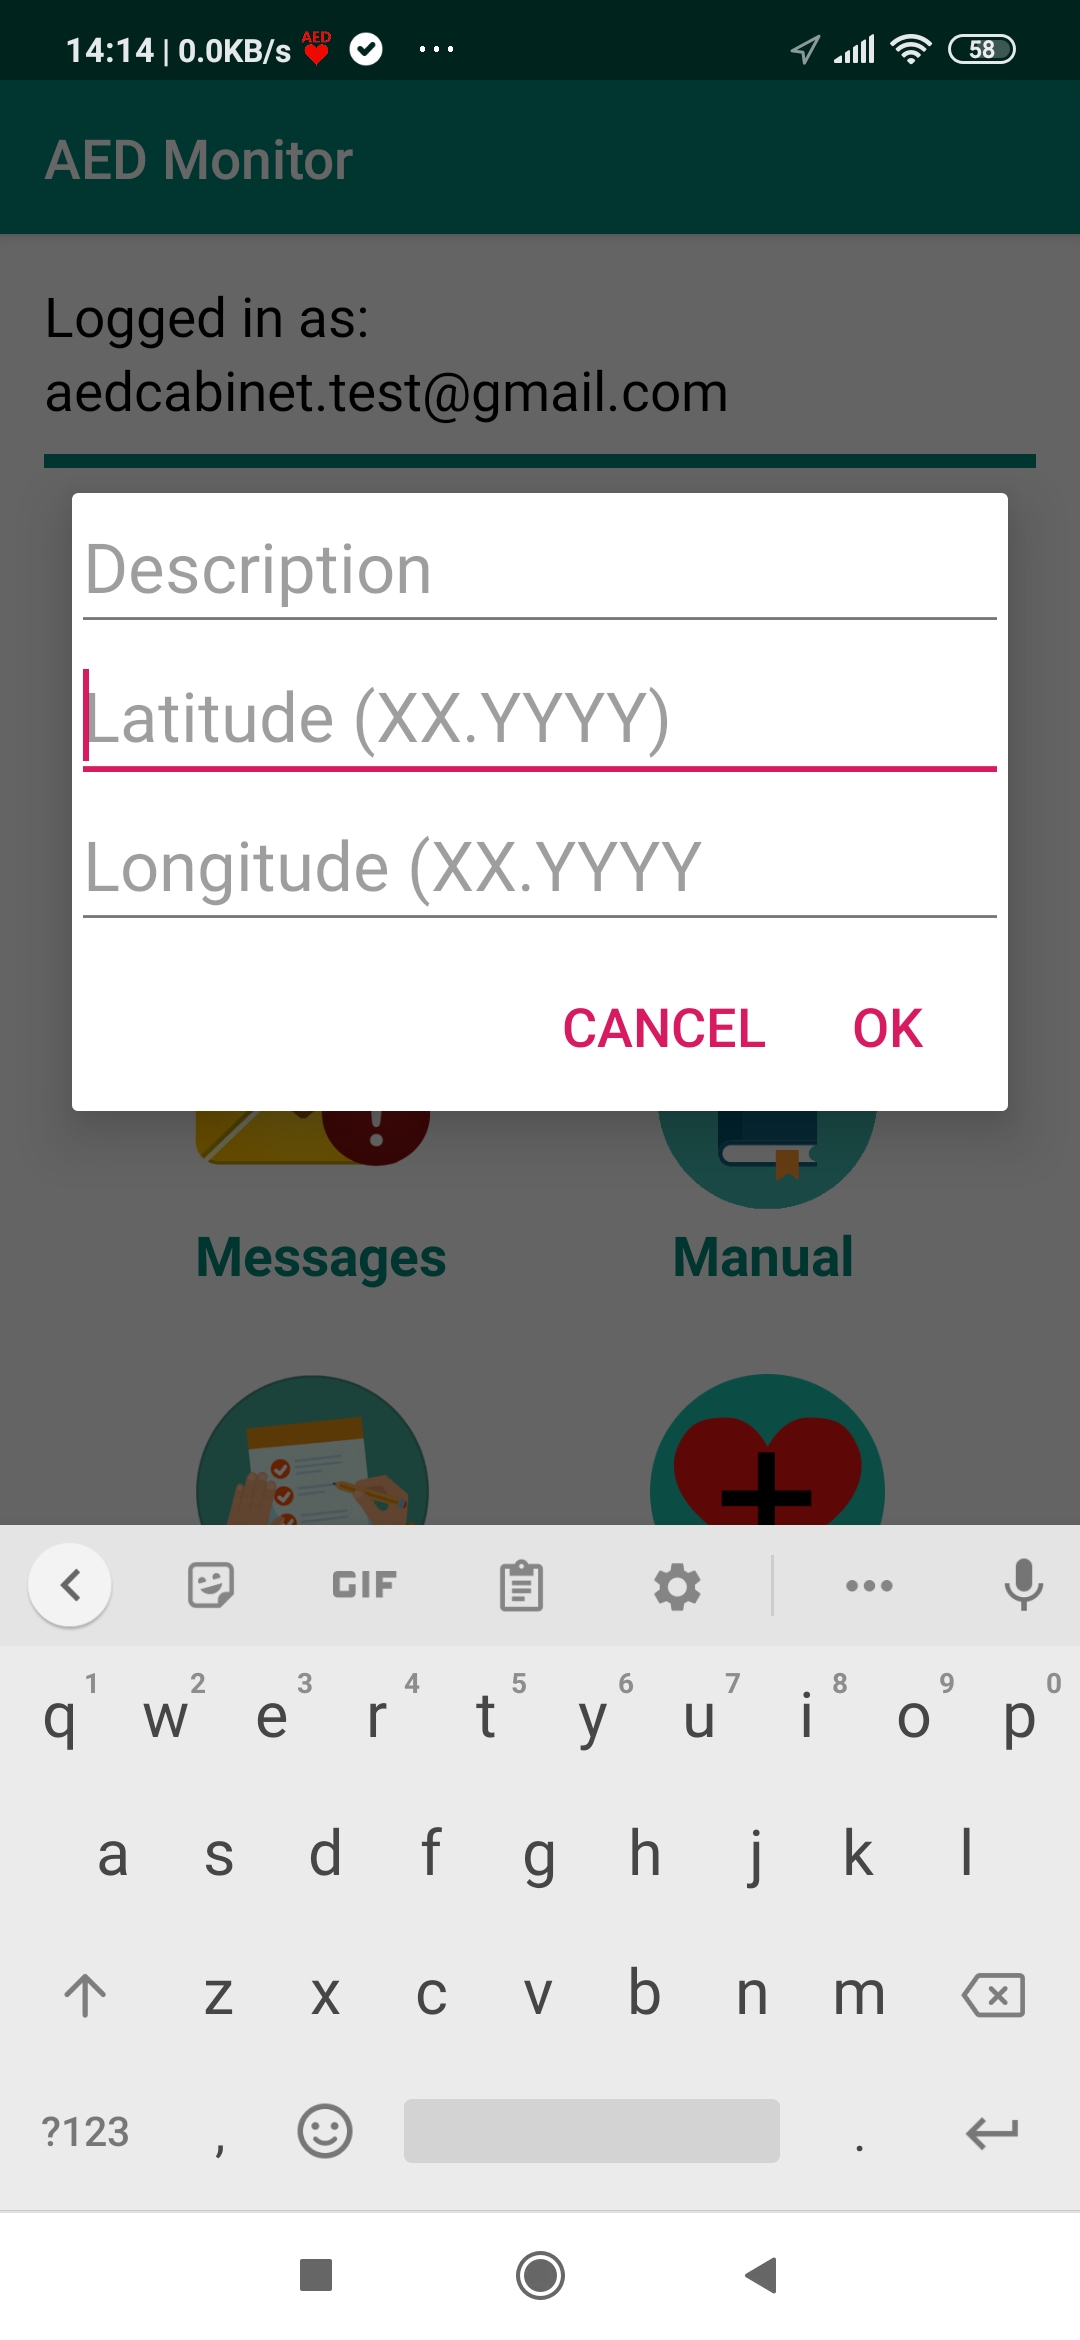
Fill in the fields and enter "OK". For the "address option", Street, city and country are mandatory fields.
Tip: When you use the "GPS coordinates option" and you long-press the Latitude field, you can use your current GPS coordinates from you phone to pin point the location of the AED. Make sure your GPS on your phone is on. The app will try to find the location using your phone's GPS and will continue if the accuracy is within 10 meters.Important: if you don’t fill in this information, the AED will not be visible on the map in the app “AED Monitor”. You can always modify this information later in the app “AED Monitor” (see AED details: viewing detailed information per AED). You can also register the AED manually in the app “AED Monitor”. See: "Method 2" under step 4.
Step 6: using the app “AED Monitor” to monitor the AED
Home Screen
All the devices that you have registered to your user ID (email from step 1) can now be accessed and monitored from your app.
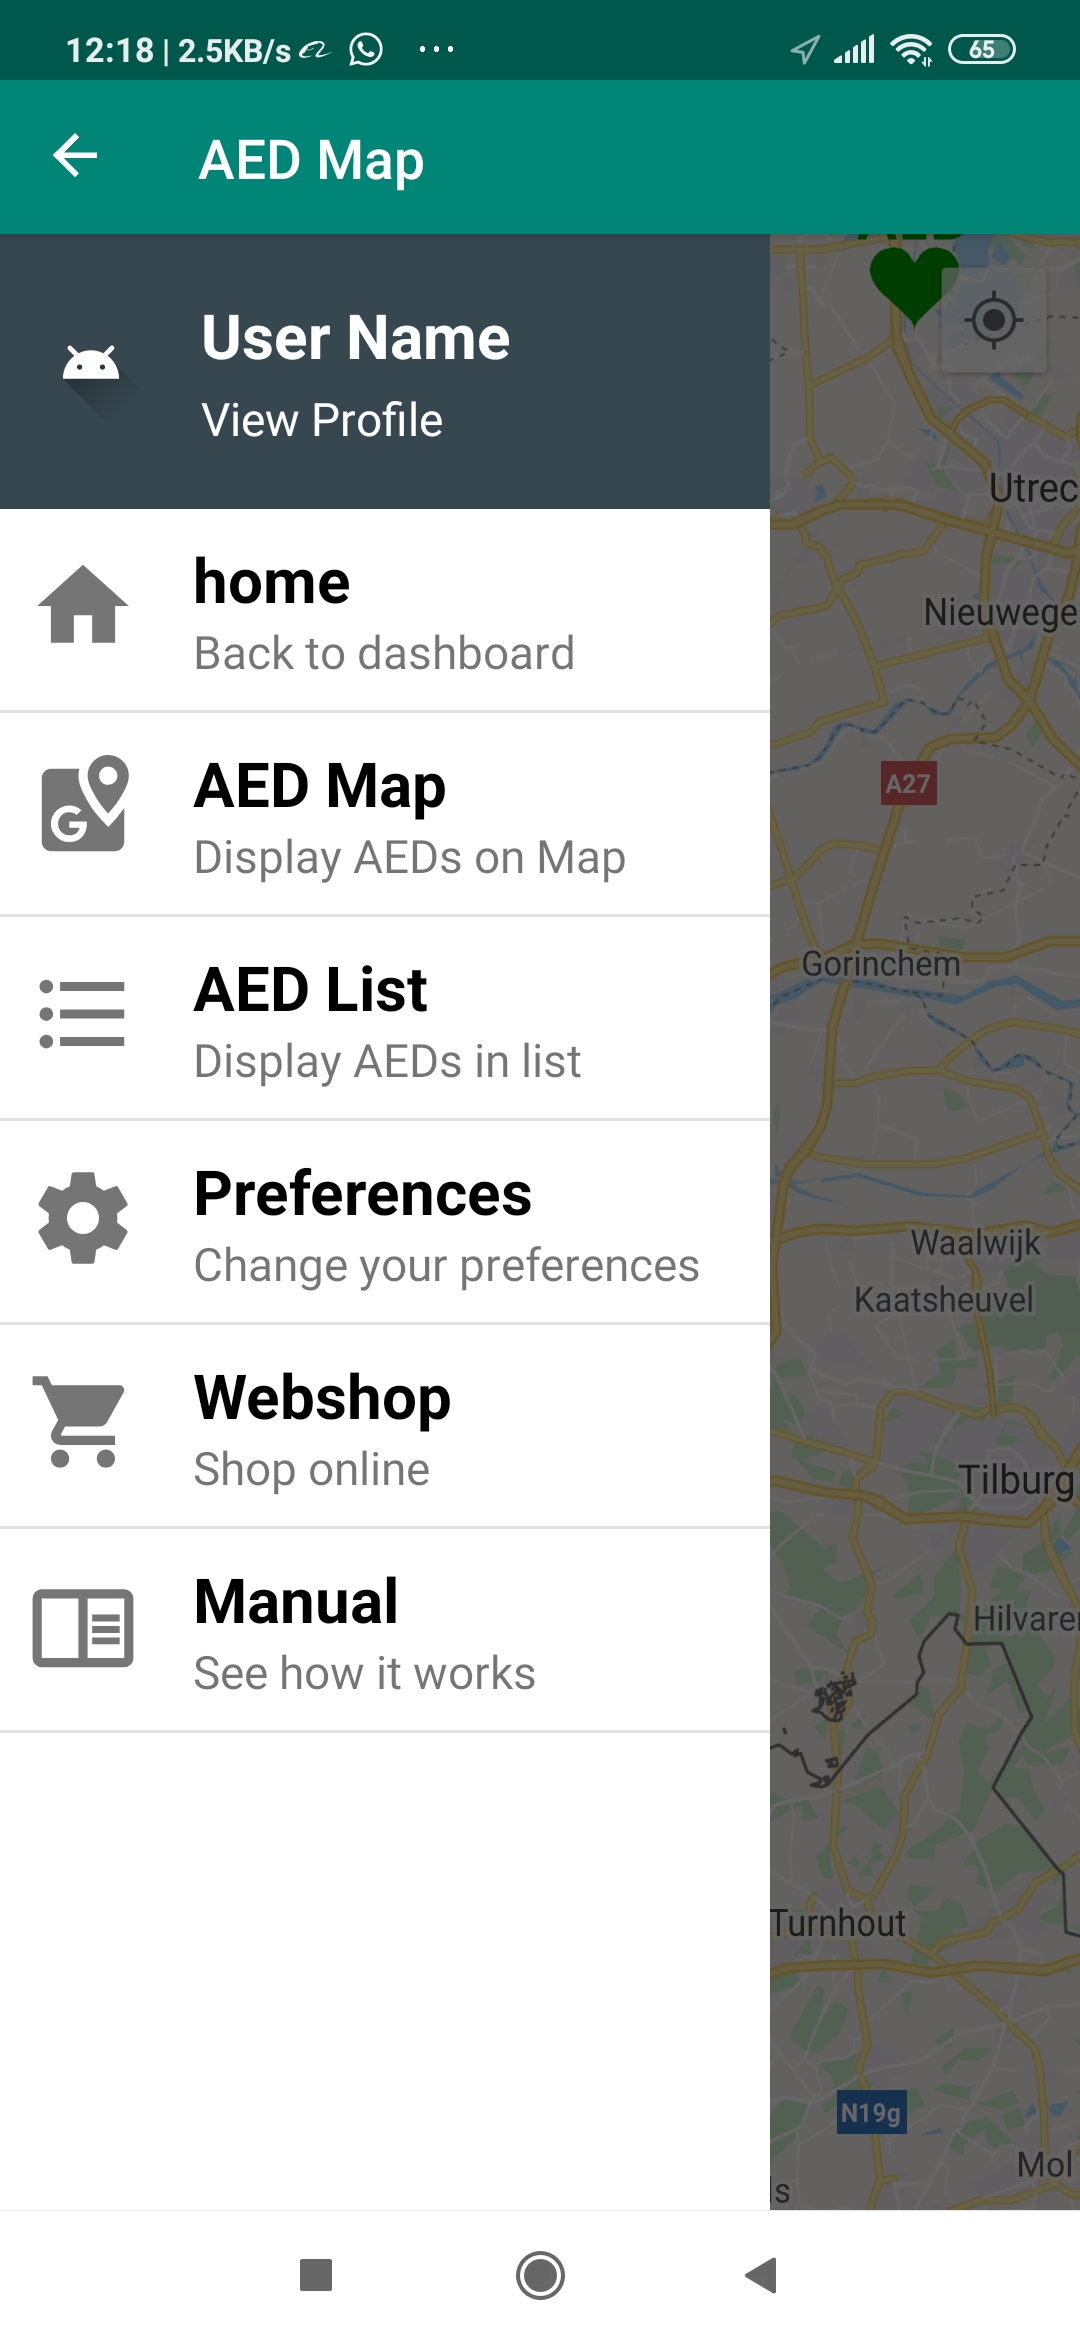
The home screen of the app is a dashboard, displaying the different functions that you can select. Each of these functions is briefly explained.
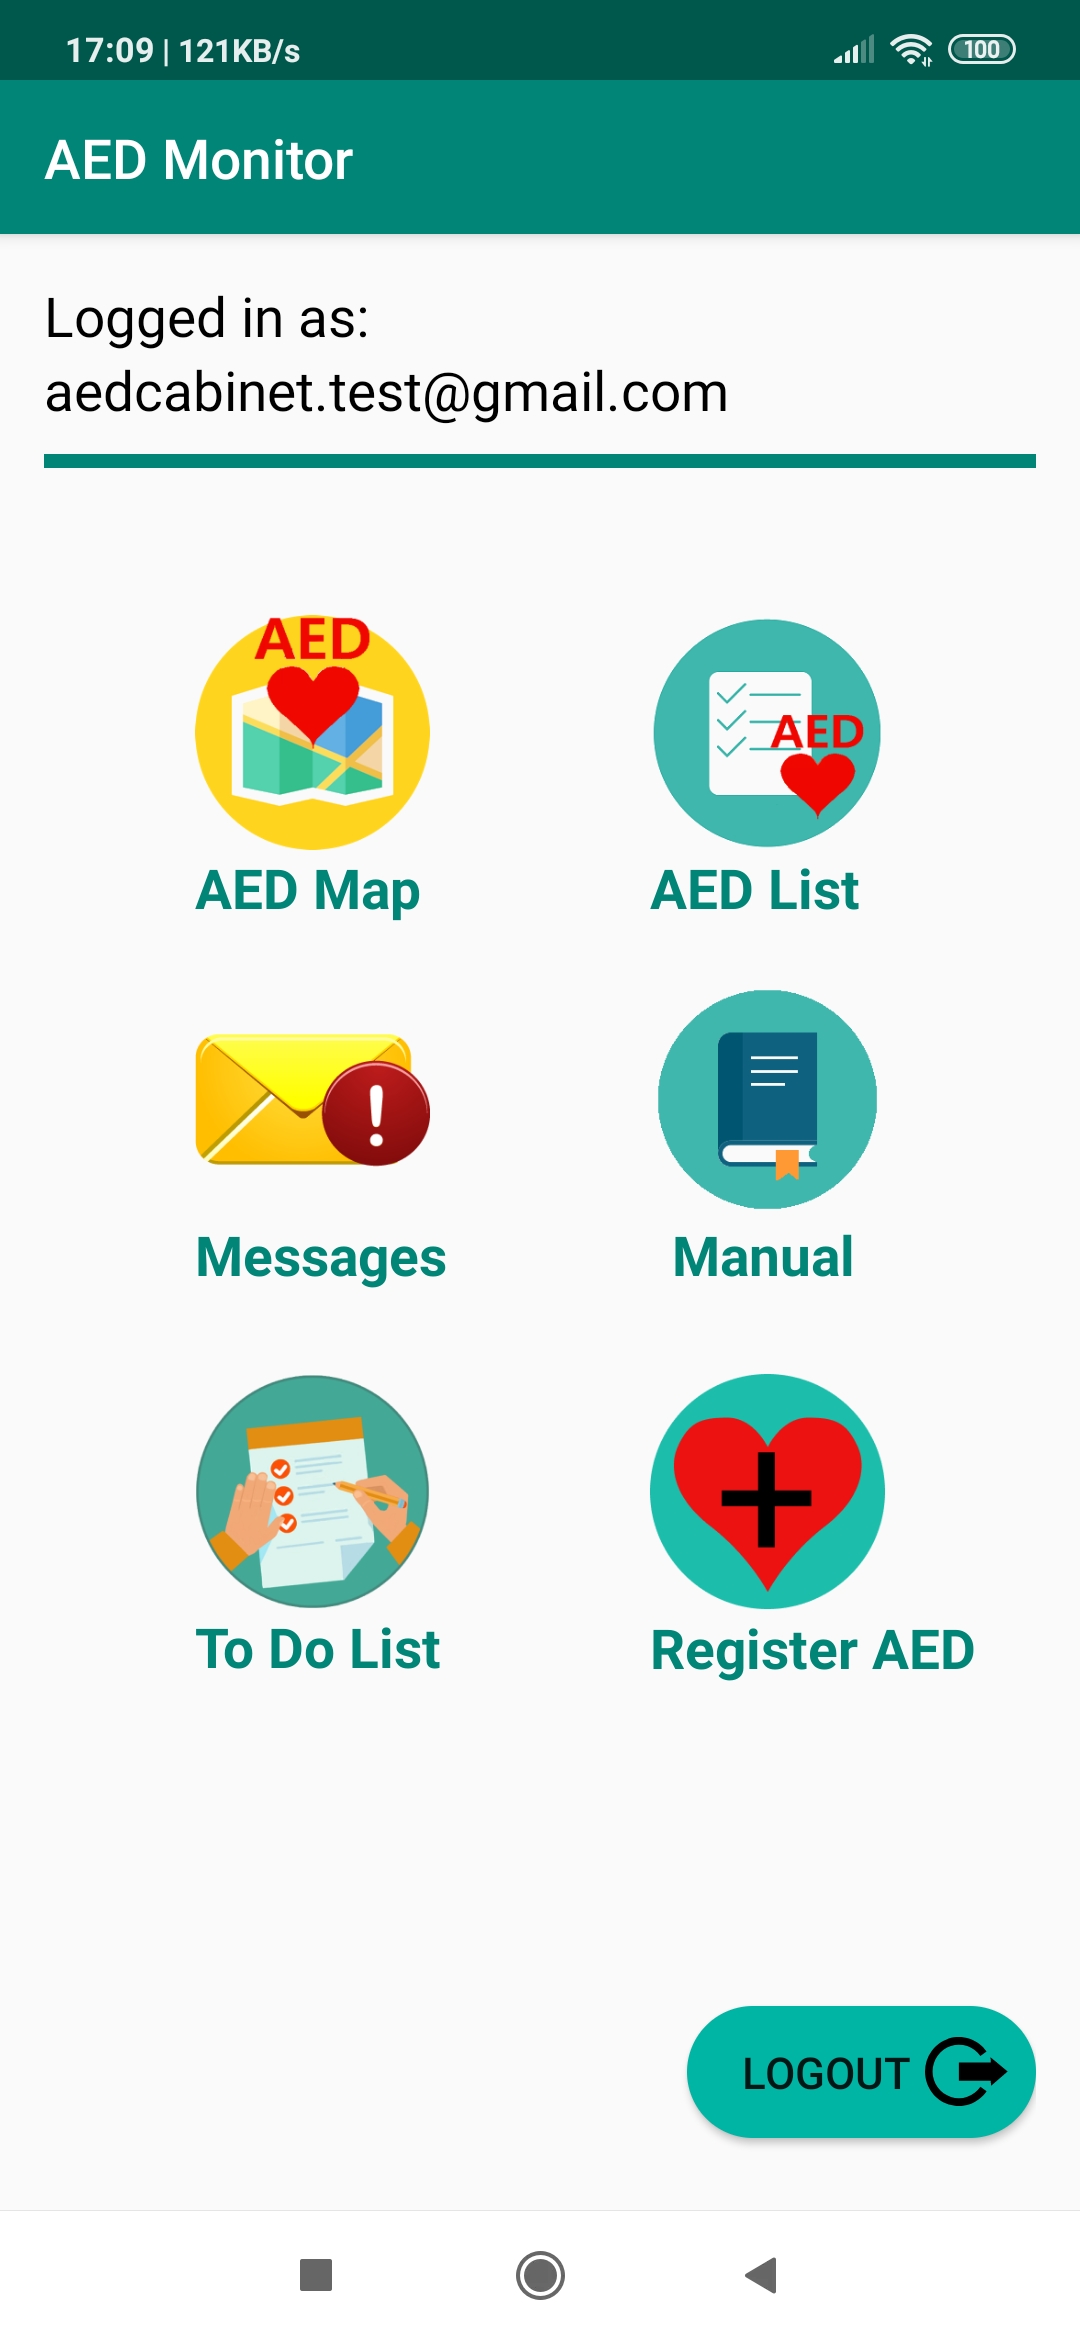
![]() AED Map: viewing the AEDs on the map
AED Map: viewing the AEDs on the map
By selecting this option in the dashboard, all registered AEDs will be displayed on a map:

Meaning of the AED colors:
 Cabinet closed, AED present
 Cabinet open, AED present
 AED removed
By clicking on an AED icon, you will see the detailed AED screen (when role is "AED administrator"), or you will navigate to the AED (when role is "first responder").
 AED Listing: viewing the AEDs in a list
By selecting this option in the dashboard, all registered AEDs will be displayed in a listing.
The AED closest to your last known position will be displayed on the top of the list.
By clicking on the icon “AED details” you will navigate to the detailed AED screen (see section “viewing detailed information per AED”).
By clicking on the icon “Navigate to AED”, google maps will be opened and direct you to the location of selected AED.
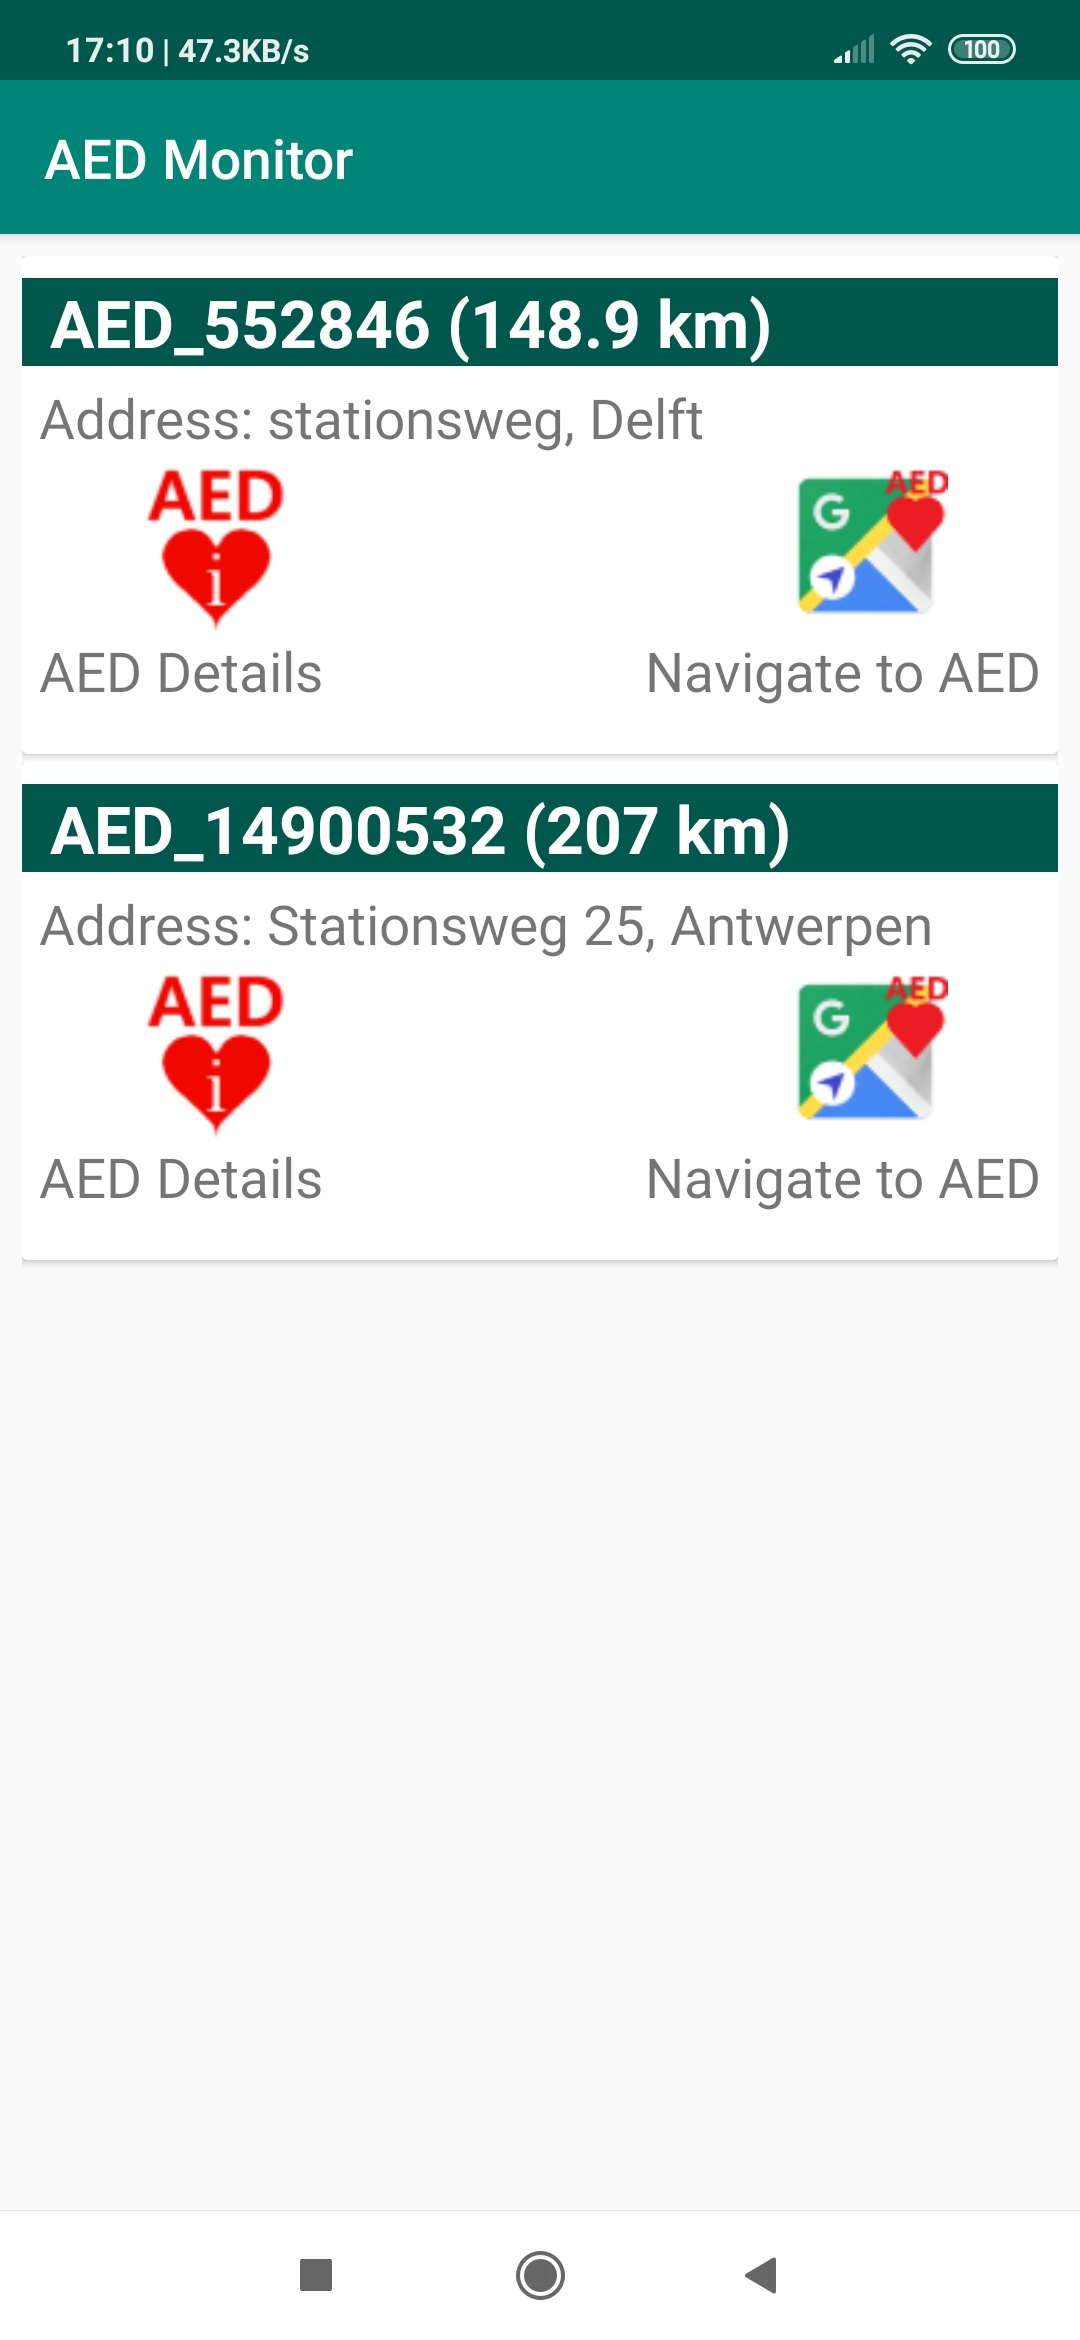
 Show detailed AED data
 Navigate to AED
AED details: viewing detailed information per AED
By selecting this option (from the “AED List” or “AED Map”), you will be able to see all detailed AED information.
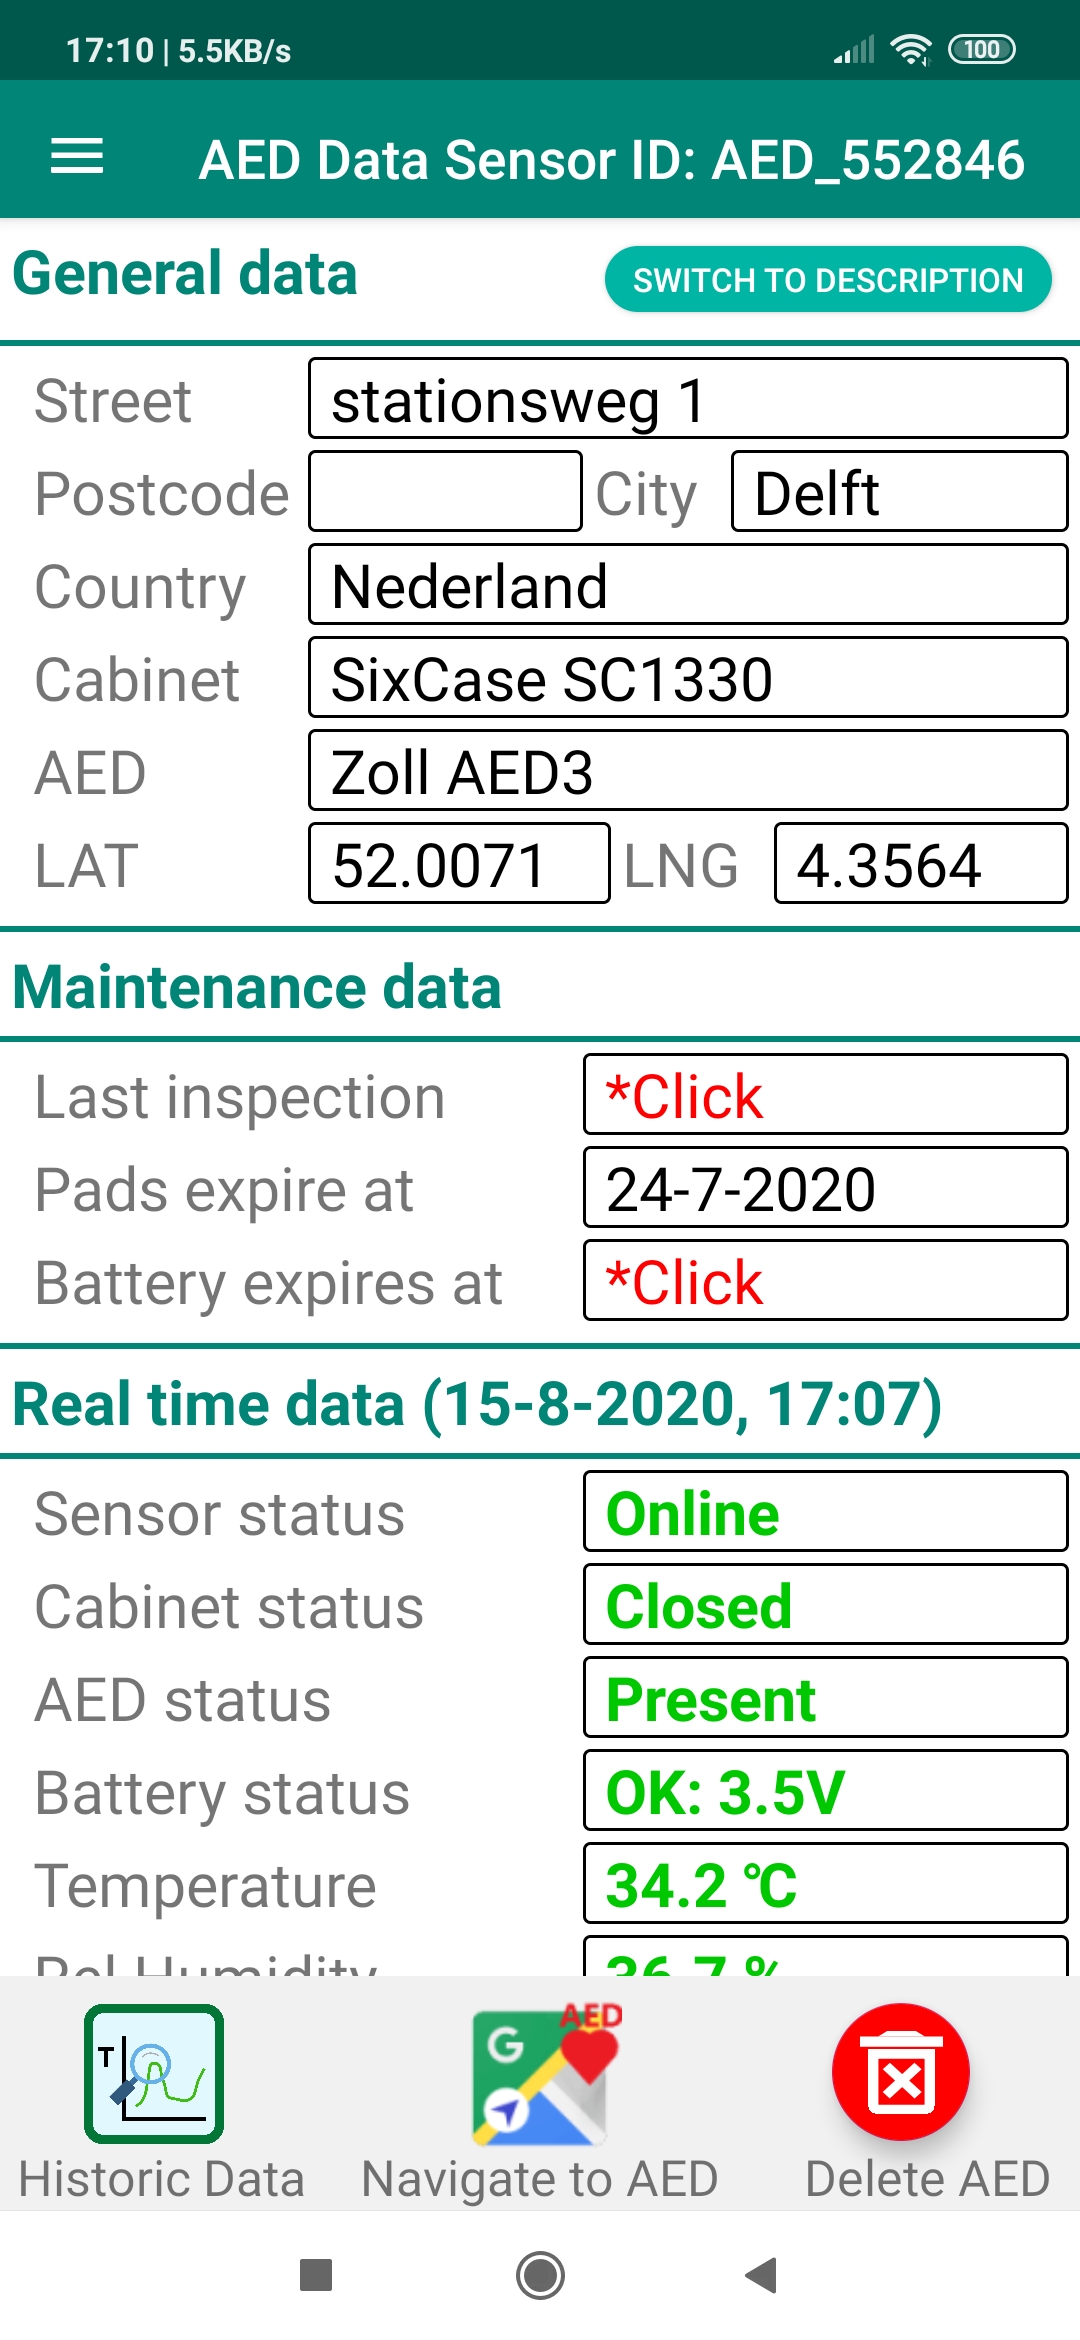
General data
In this section, you can also enter (or modify) the different location fields, AED type or AED cabinet.
If you press "switch to description", you can enter a description.
Tip: When you long-press the Latitude field, you can use your current GPS coordinates from you phone to pin point the location of the AED.
Make sure your GPS on your phone is on. The app will try to find the location using your phone's GPS and will continue if the accuracy is within 10 meters.
Maintenance data
Here you can define the expiration dates of the pads and battery or enter the last time the cabinet and AED have been inspected.
Real time data
In the header of this field, you can see when the last real time data have been uploaded:
- Sensor Status: current status of the sensor
- Online: data have recently been added
- Offline: sensor has not uploaded data recently
- Cabinet status:
- Open: cabinet is open
- Closed: cabinet is closed
- AED status:
- Present: AED is inside the cabinet
- Removed: AED has been removed from the cabinet
- Battery status: Provides the last known status of the sensor power (in Volts). This is only relevant if you have a battery operated device. This should be above 2.4 V for proper functioning. When the power gets too low, the administrator will receive a message that the sensor battery is low and must be replaced (also see Section “Changing Preferences”).
- Temperature: Here the last measured temperature of the sensor (AED) is displayed (degrees Celsius). If the temperature gets too low or too high, a warning will be sent to the AED administrator (also see Section “Changing Preferences”).
- Relative Humidity: Here the last measured (relative) humidity of the sensor (AED) is displayed (%). If the humidity gets too high, a warning will be sent to the AED administrator (also see Section “Changing Preferences”).
With the 3 buttons on the bottom you can activate the following functions:
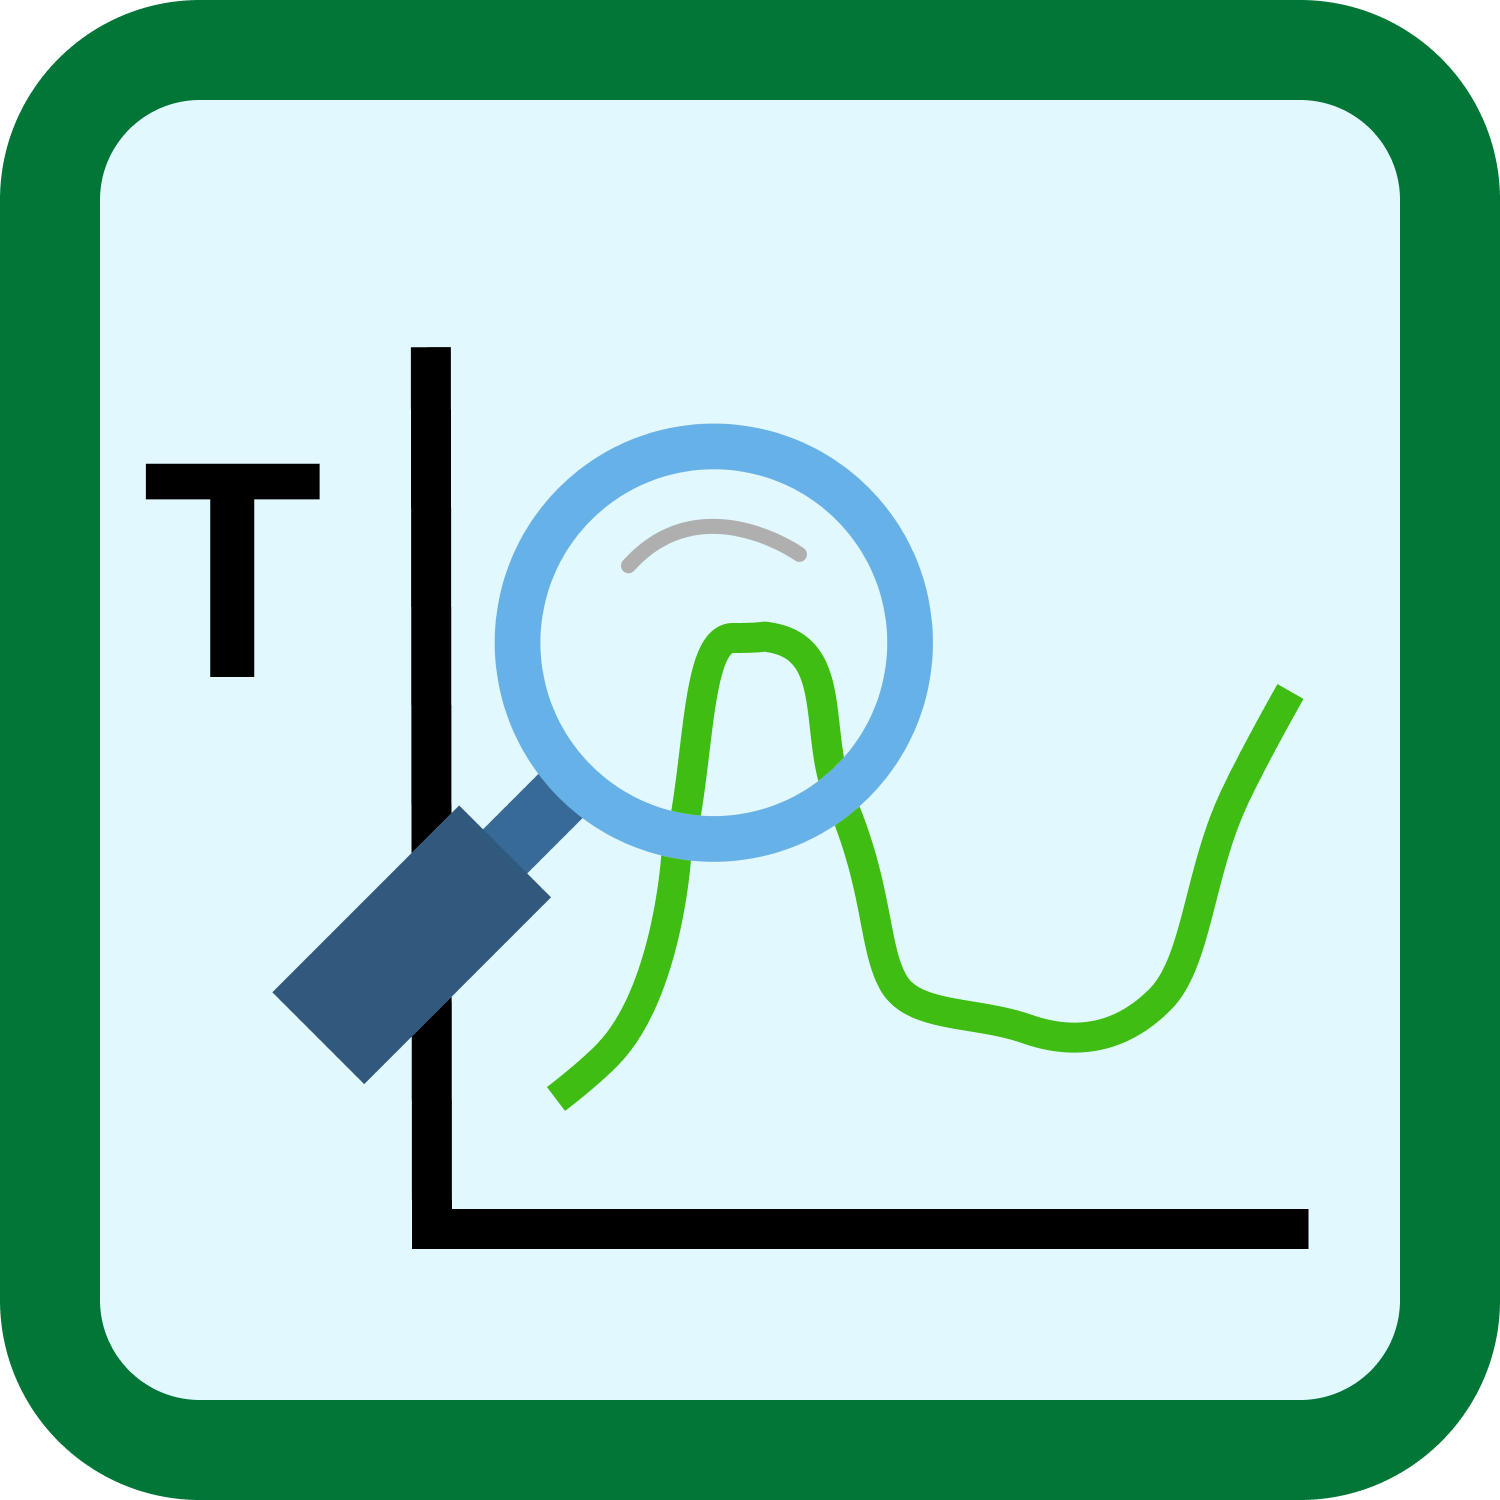 Click this icon to view the historic logged data of this AED
Click this icon to navigate (google maps) to this AED
 Click this icon to delete the AED from the database
Tip: to make full use of the app possibilities, enter all data in the relevant fields of the AED. Now, you can receive warnings when the pads or battery of the AED need to be replaced or inspection of the AED and AED cabinet is required. Proper and timely maintenance is crucial to keep the AED operational.
Viewing historic (logged) data of AEDs
By clicking on this icon, you will see the following (dashboard) screen where you can make a further selection of which historic logged data you want to view:
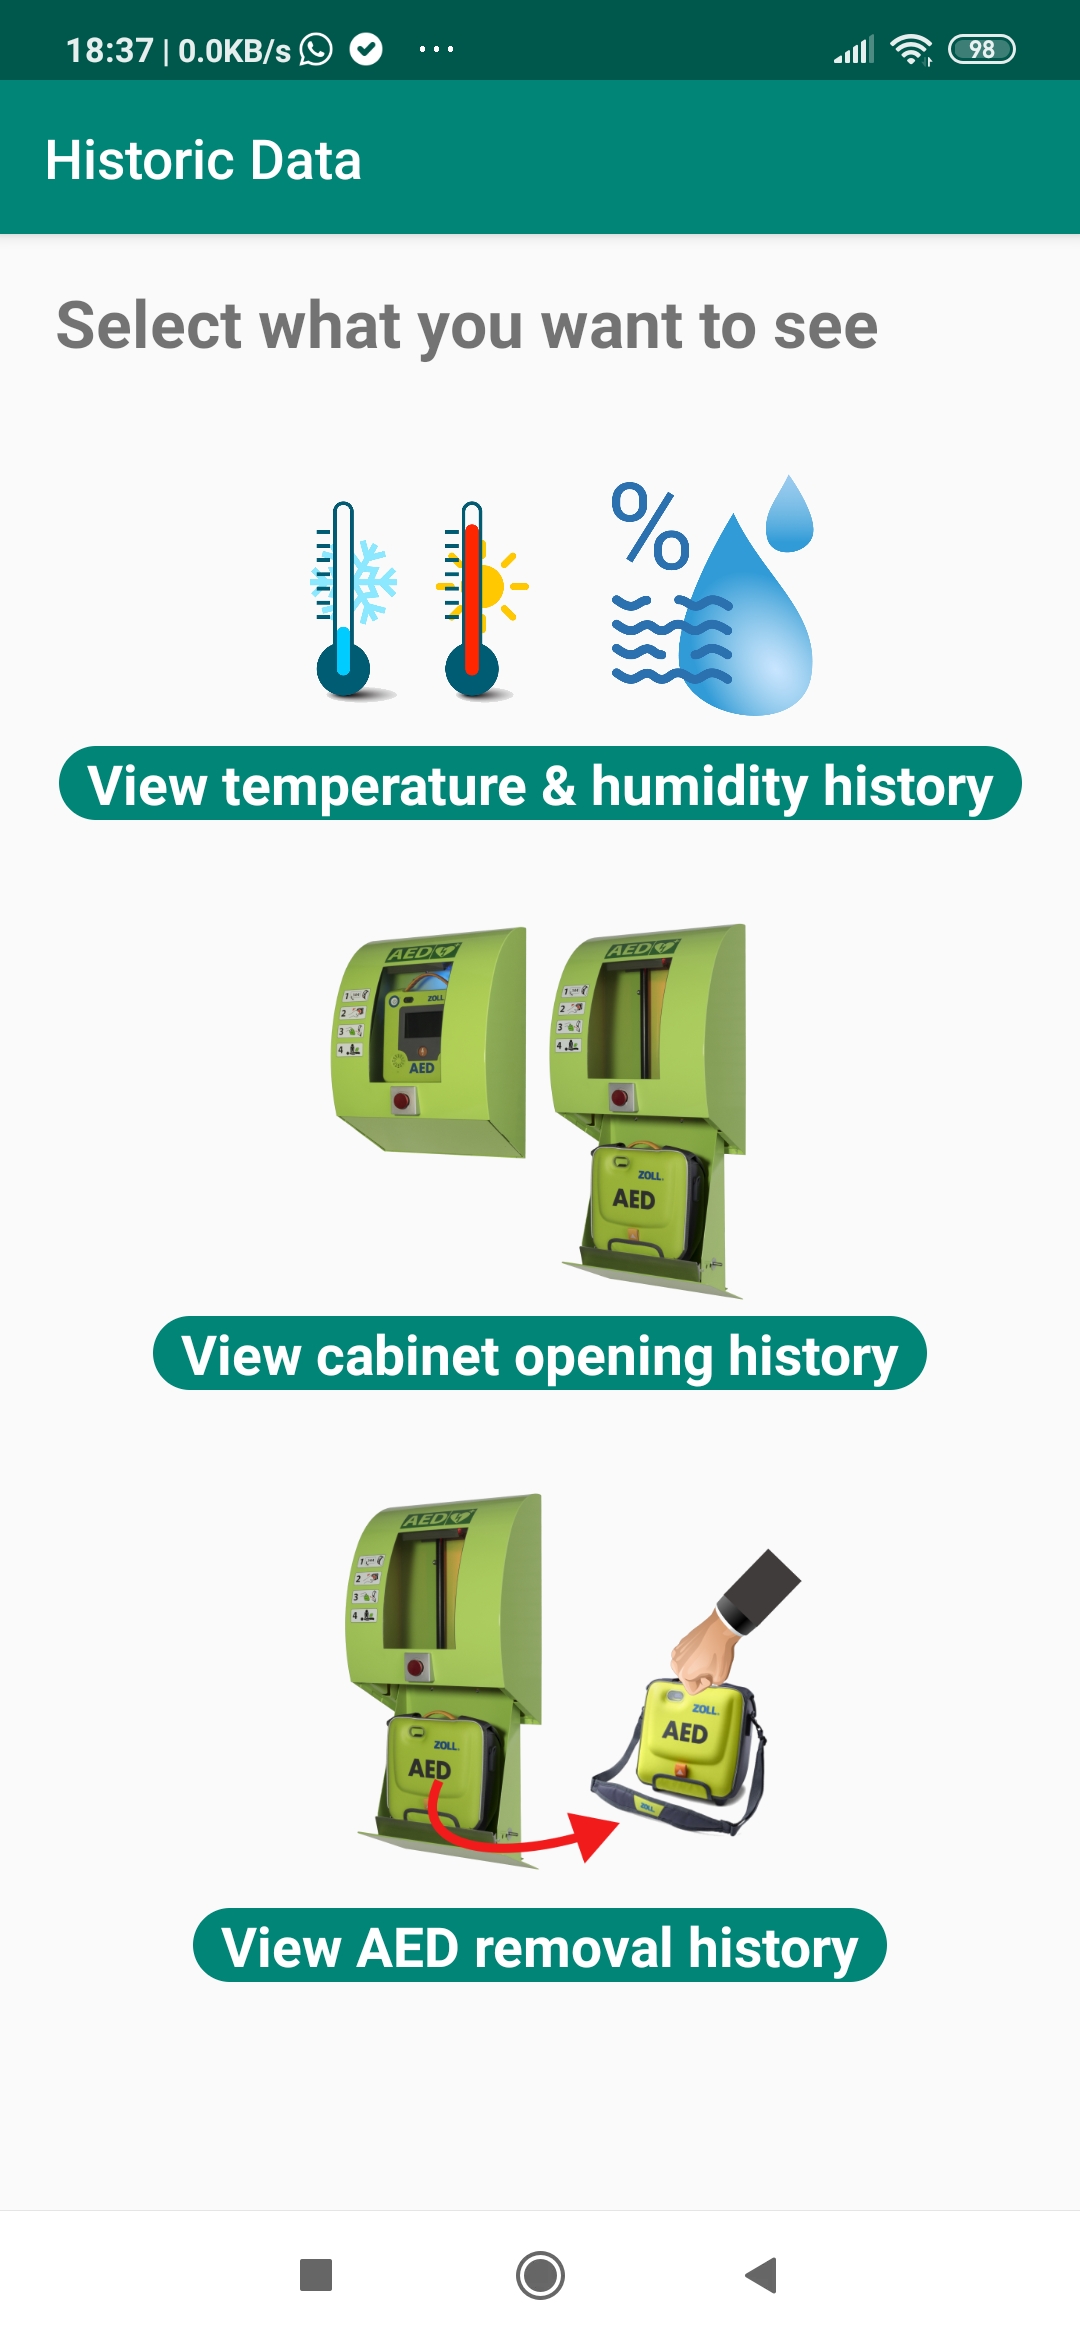
 Temperature / Relative humidity
By selecting this icon, you can view the history of the temperature and (relative) humidity inside the cabinet.
You can switch between the temperature and humidity by clicking on one of the 2 icons at the left side of the screen.
By clicking the button “delete data” all historic (temperature and humidity) data will be removed.
The 4 buttons below the graph can be used to define the timeframe for which you would like to view the data.
You can zoom closer into the data by moving 2 fingers on the screen away from each other.
You can “scroll” the graph to the left or to the right by moving 1 finger over the graph.
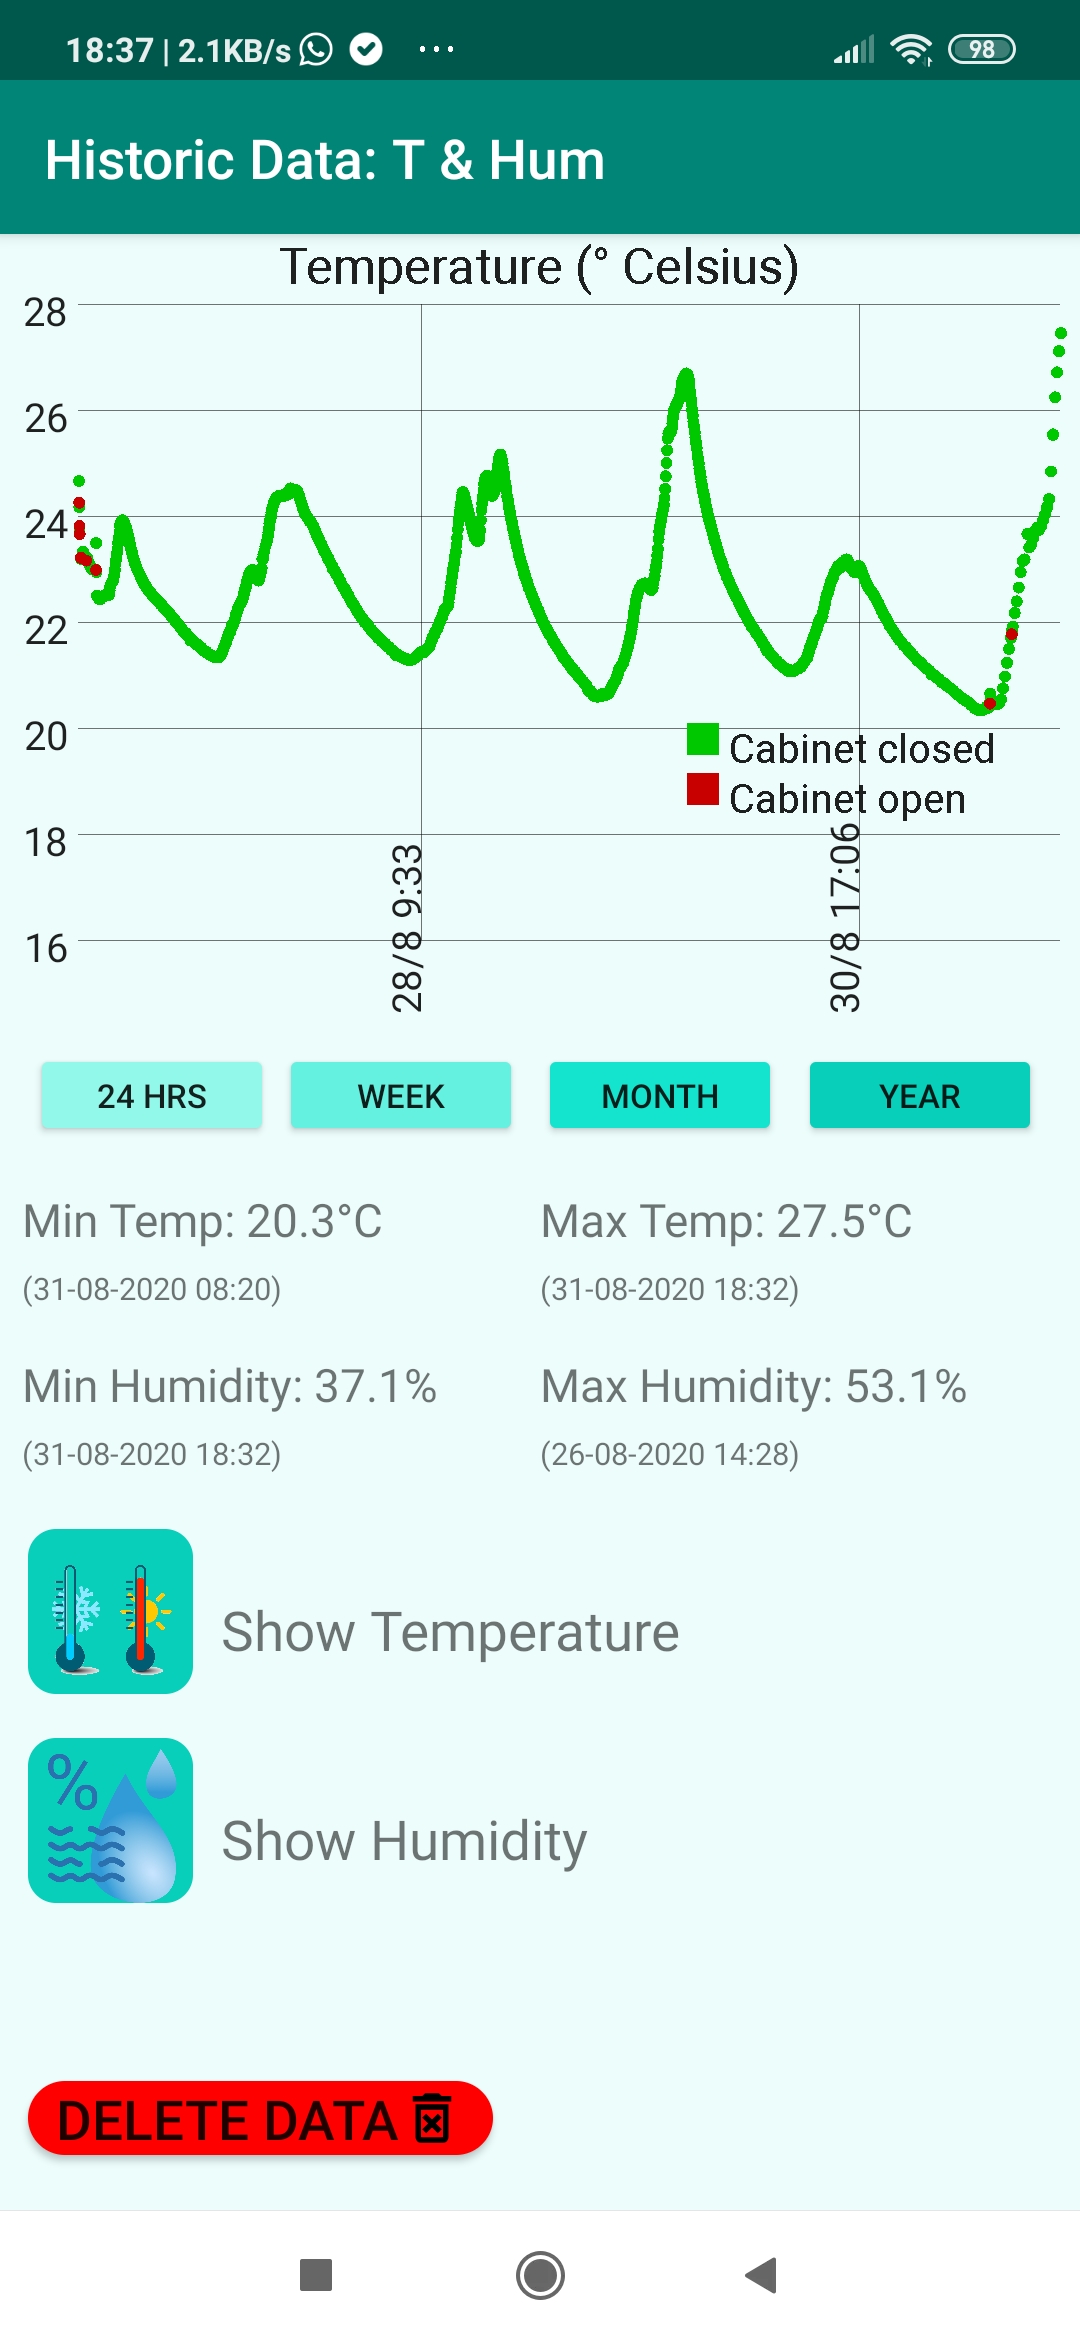
 Show Temperature
 Show Humidity
Green data points are measured data when the cabinet was closed
Red data points are measured when the cabinet was open
Below the graph, the minimum and maximum values of the measured data are displayed, including the time when this measurement was taken. These max/min values are displayed for the last 24 HRS, week, month or year, depending on the selected time period.
Important: clicking the delete button will permanently delete all historic temperature and humidity data from the server.
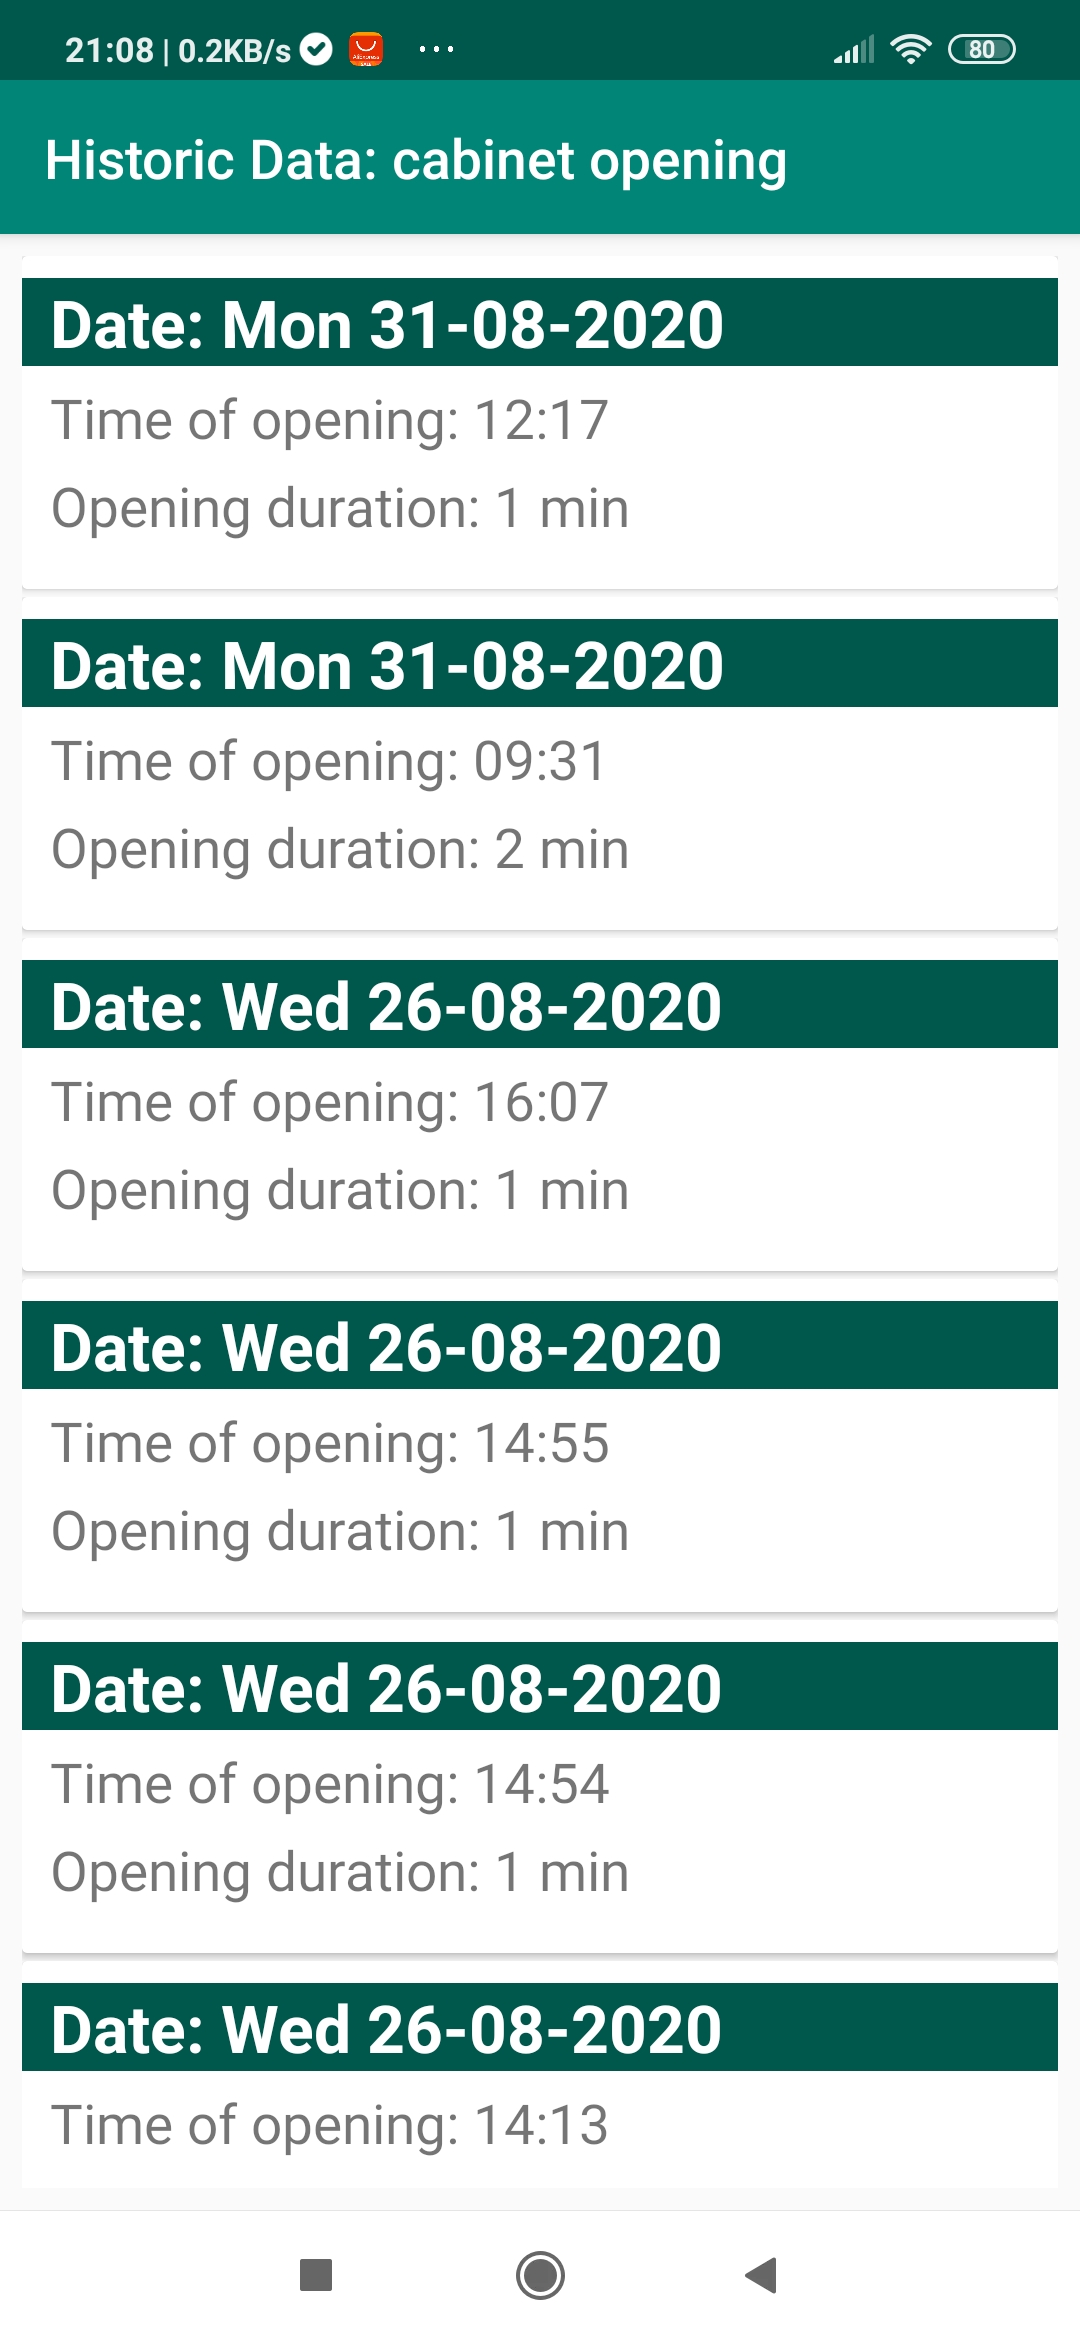
 View opening history
By selecting this icon, you can view the history of when the cabinet has been opened and for how long.
Note that these data are accurate up to a about a minute, because of the time it requires the WIFI module to connect to the internet and upload the data. In case the connection to the server could not be made, the information is lost.
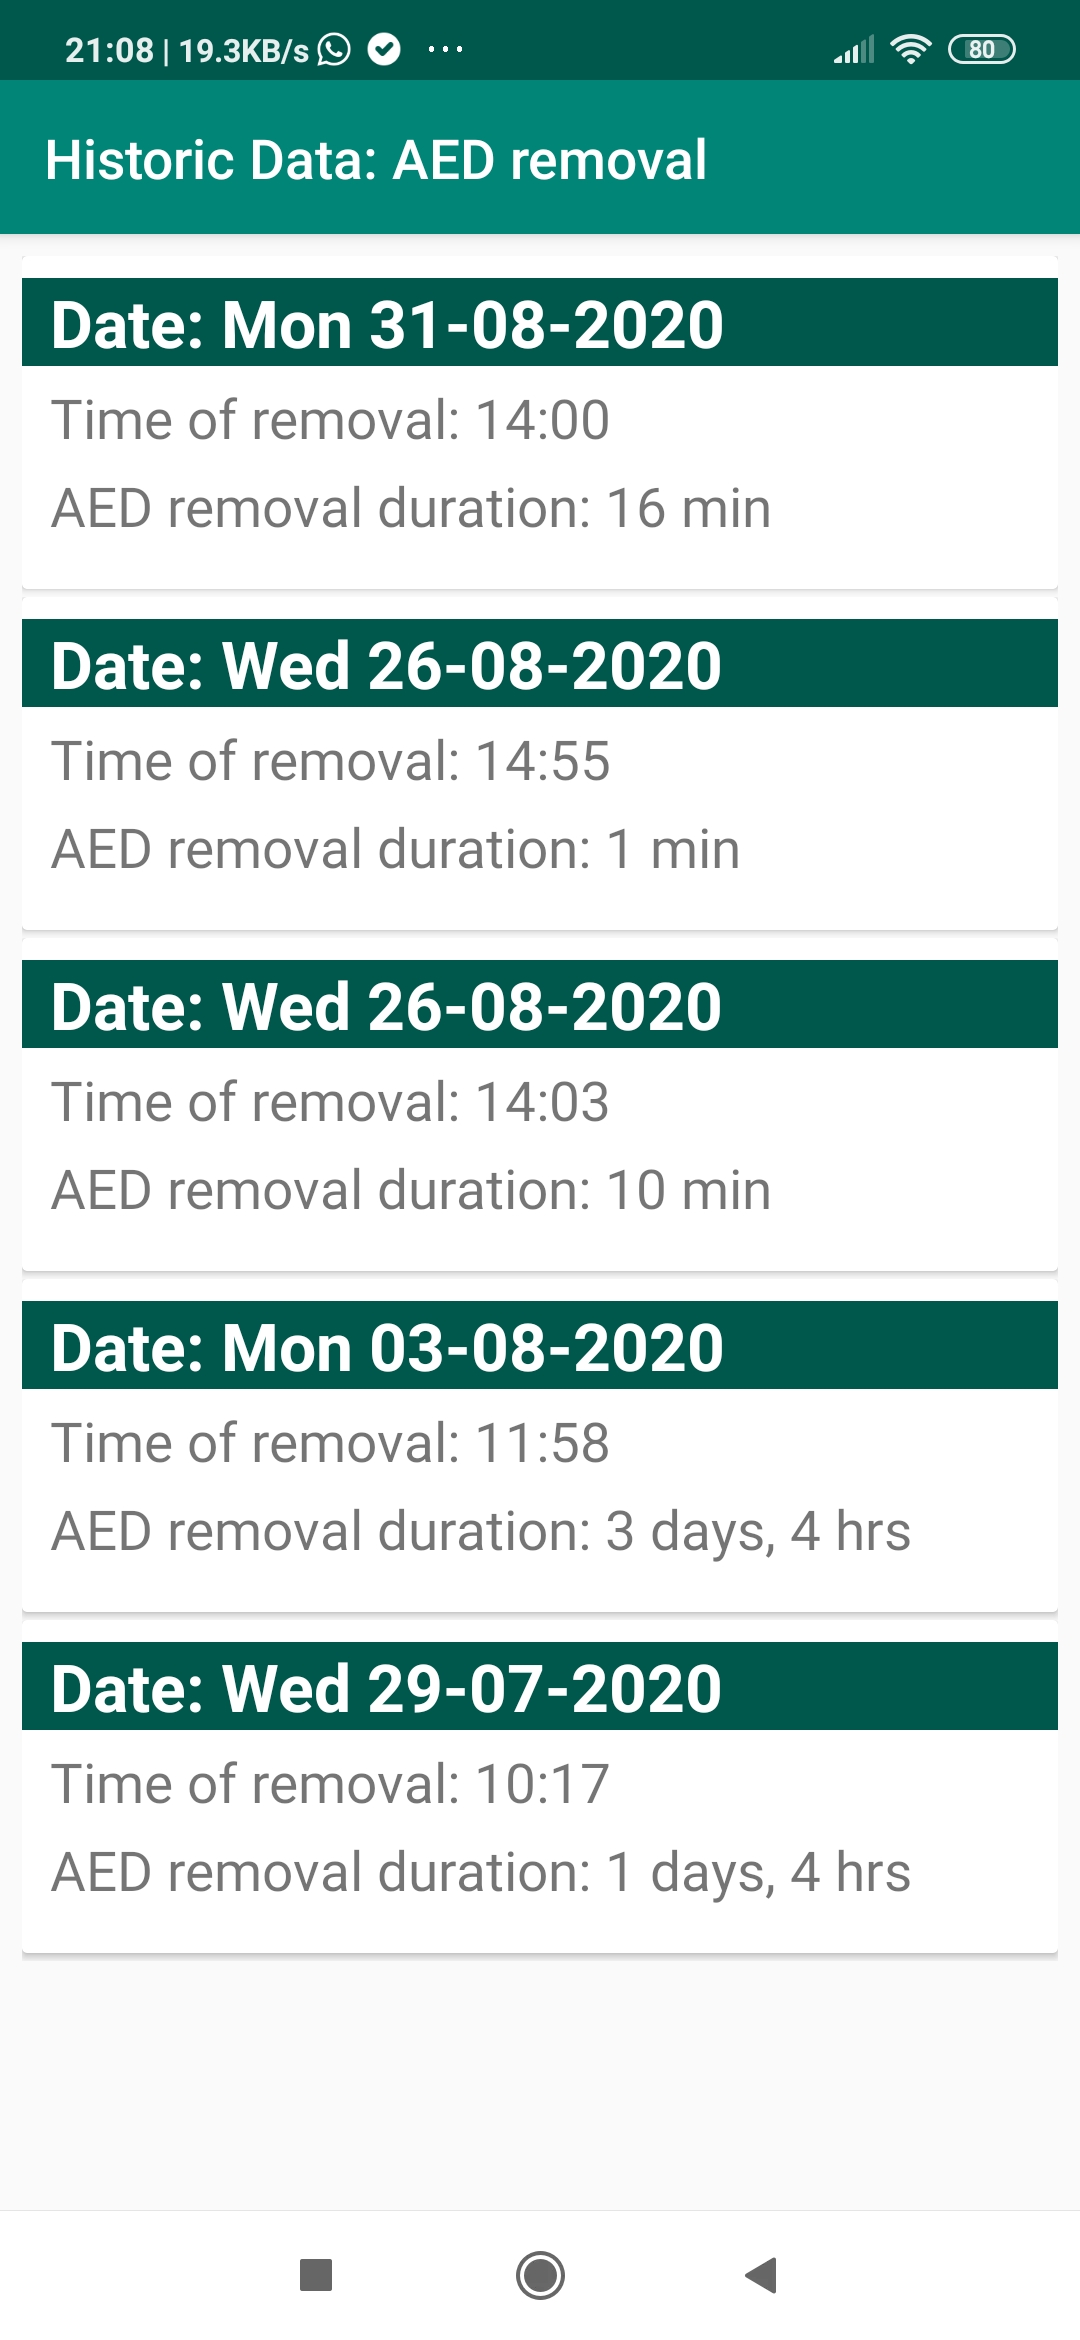
 AED removal
By selecting this icon, you can view the history of when the AED has been removed from the cabinet and for how long. Note that these data are accurate up to a about a minute, because of the time it requires the WIFI module to connect to the internet and upload the data. In case the connection to the server could not be made, the information is lost.
 Viewing (warning) messages
Selecting this icon from the home menu (dashboard), will display all messages that have been received.
A typical screen would be:
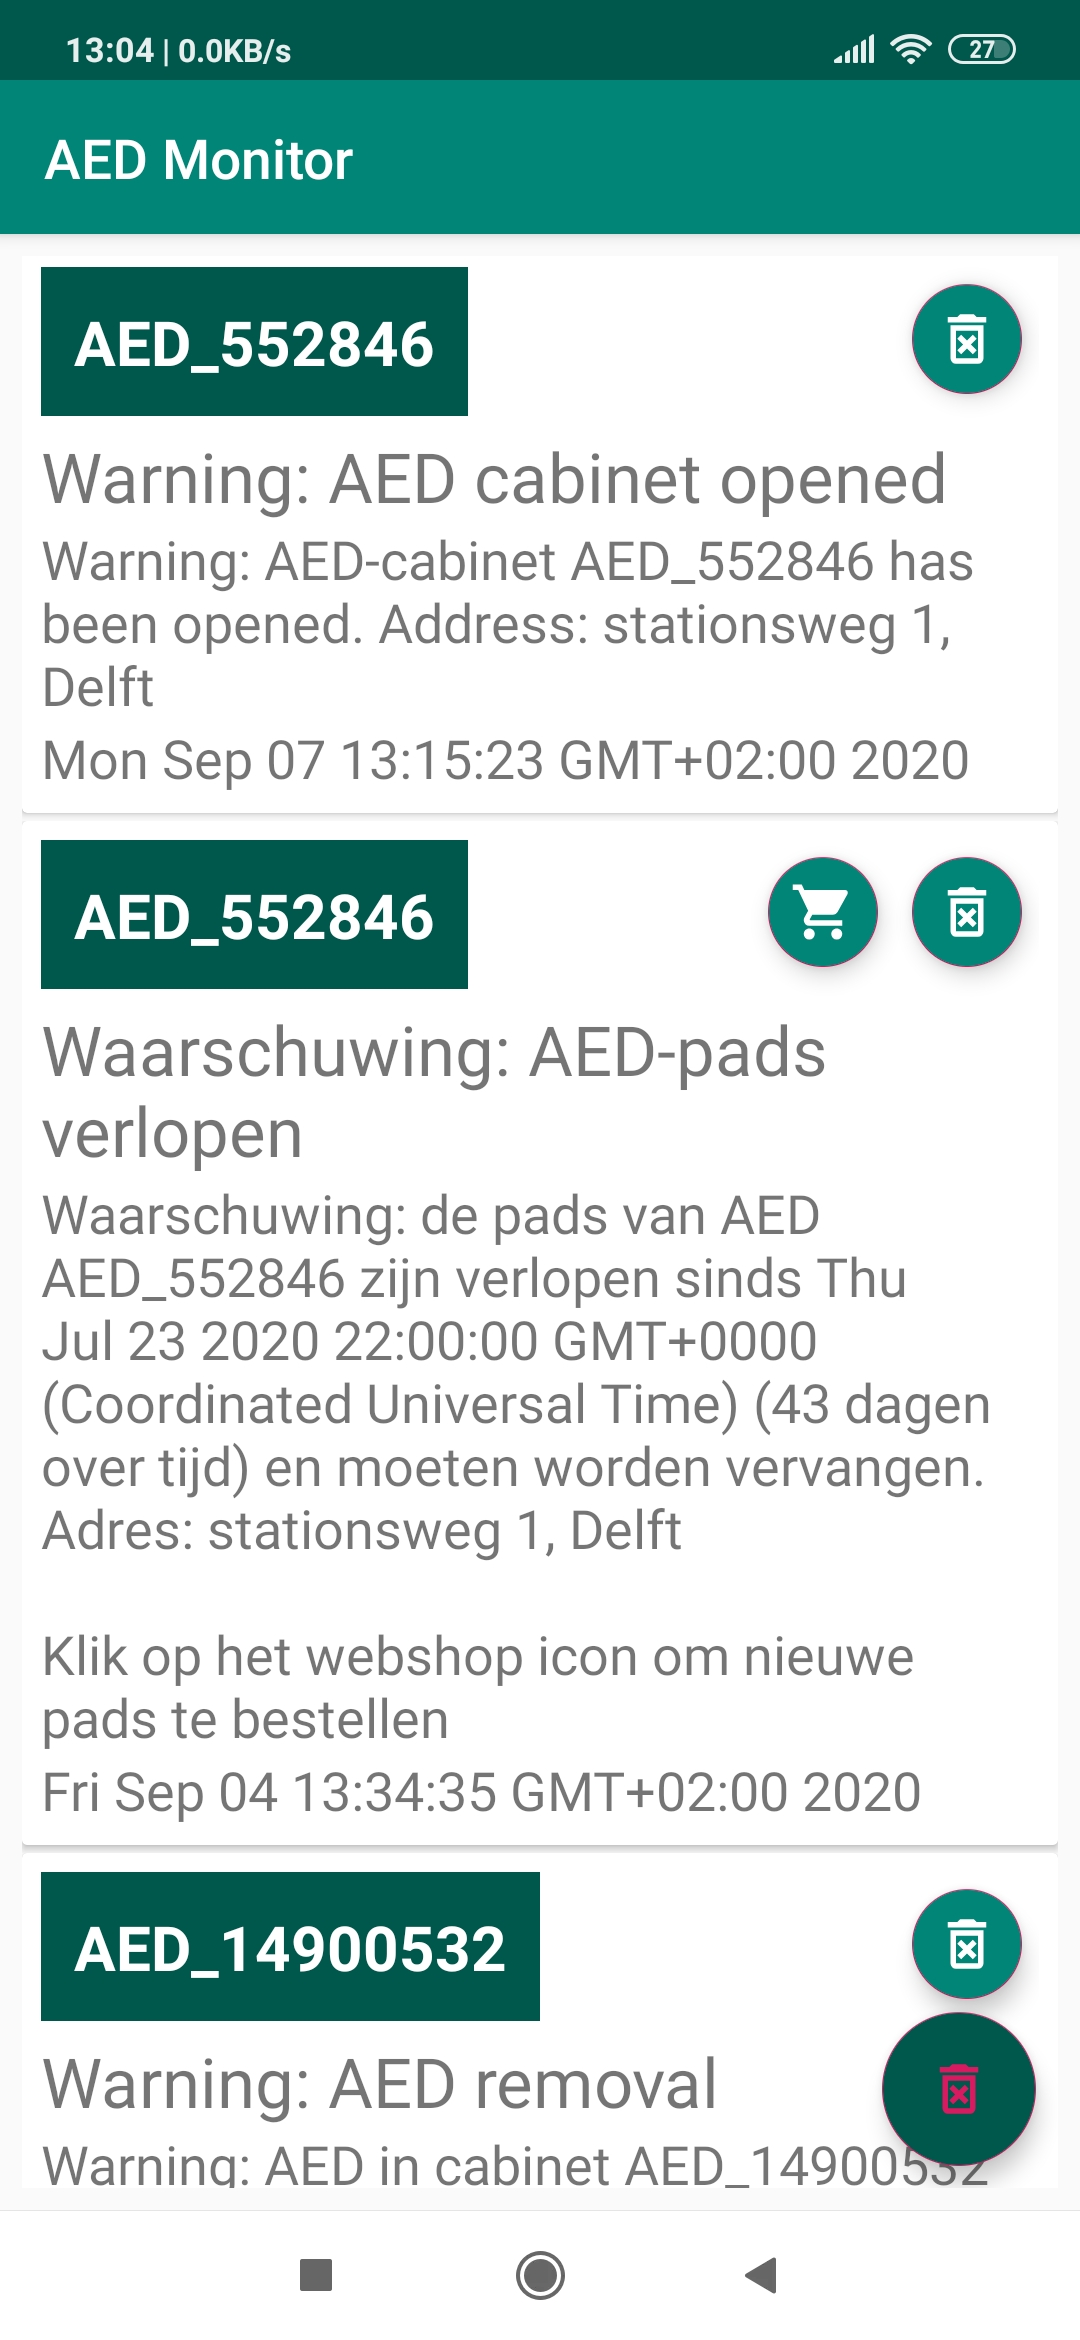
 Delete single message
![]() Go to Webshop
Go to Webshop
 Delete all messages
Type of messages
There are 5 type of (warning) messages:
- Cabinet has been opened
This warning is sent when the cabinet has been opened. - AED has been removed
This warning is sent when the AED has been removed from the cabinet. - Sensor battery is low
Only relevant when you have a battery operating device. This warning is sent when the battery of the WIFI module/sensor is low. If you receive this warning, please replace the AA batteries. - AED pad has expired
This warning is sent when the pads of the AED have expired and need to be replaced. This is only functional when the expiration date of the pads is set in the “AED details”. After replacing the pads, please enter the new expiration date in the “AED details”. - AED battery has expired
This warning is sent when the battery of the AED has expired and needs to be replaced. This is only functional when the expiration date of the battery is set in the “AED details”. After replacing the battery, please enter the new expiration date in the “AED details”. - Temperature in cabinet is outside limits
The temperature inside the cabinet can be too low (<0 degrees Celsius) or too high (>50 degrees Celsius). If one of these limits is exceeded for too long, a warning will be sent. If this happens, check the heating/cooling of your cabinet and take appropriate action to assure that the AED is stored within the limits specified by the manufacturer. - Humidity in cabinet is too high
The (relative) humidity inside the cabinet can be too high (>95%). If this limit is exceeded for too long, a warning will be sent. If this happens, check the reason and take appropriate action to assure that the AED is stored within the limits specified by the manufacturer.
Tip: Ordering of AED pads and batteries can be done by clicking on the webshop icon in the app message screen or following the link in the warning email message. You will be automatically directed to the applicable web site page of your dealer where you can order the correct pads or battery.
In the preferences, you can select which type of messages you want to receive. This setting can be modified for an individual AEDs or set for all AEDs at once: see Section “Changing Preferences”.
Removing messages Individual messages can be deleted by clicking on the "DELETE" icon in the message below the Title bar The delete button on the right bottom of the screen will permanently delete all messages.
Changing Preferences
Preferences can be changed on an individual basis (per AED) or for all AEDs at once.
Changing the same preference for all AEDS at the same time
This can be very convenient if you have many AEDs under your control and if you want the same settings for all the AEDs.
To do this, select “Map” from the main menu (dashboard).
After the map has loaded, swipe from the left edge of the phone to the right or select the menu icon on the top teft corner.
This will display the following screen.
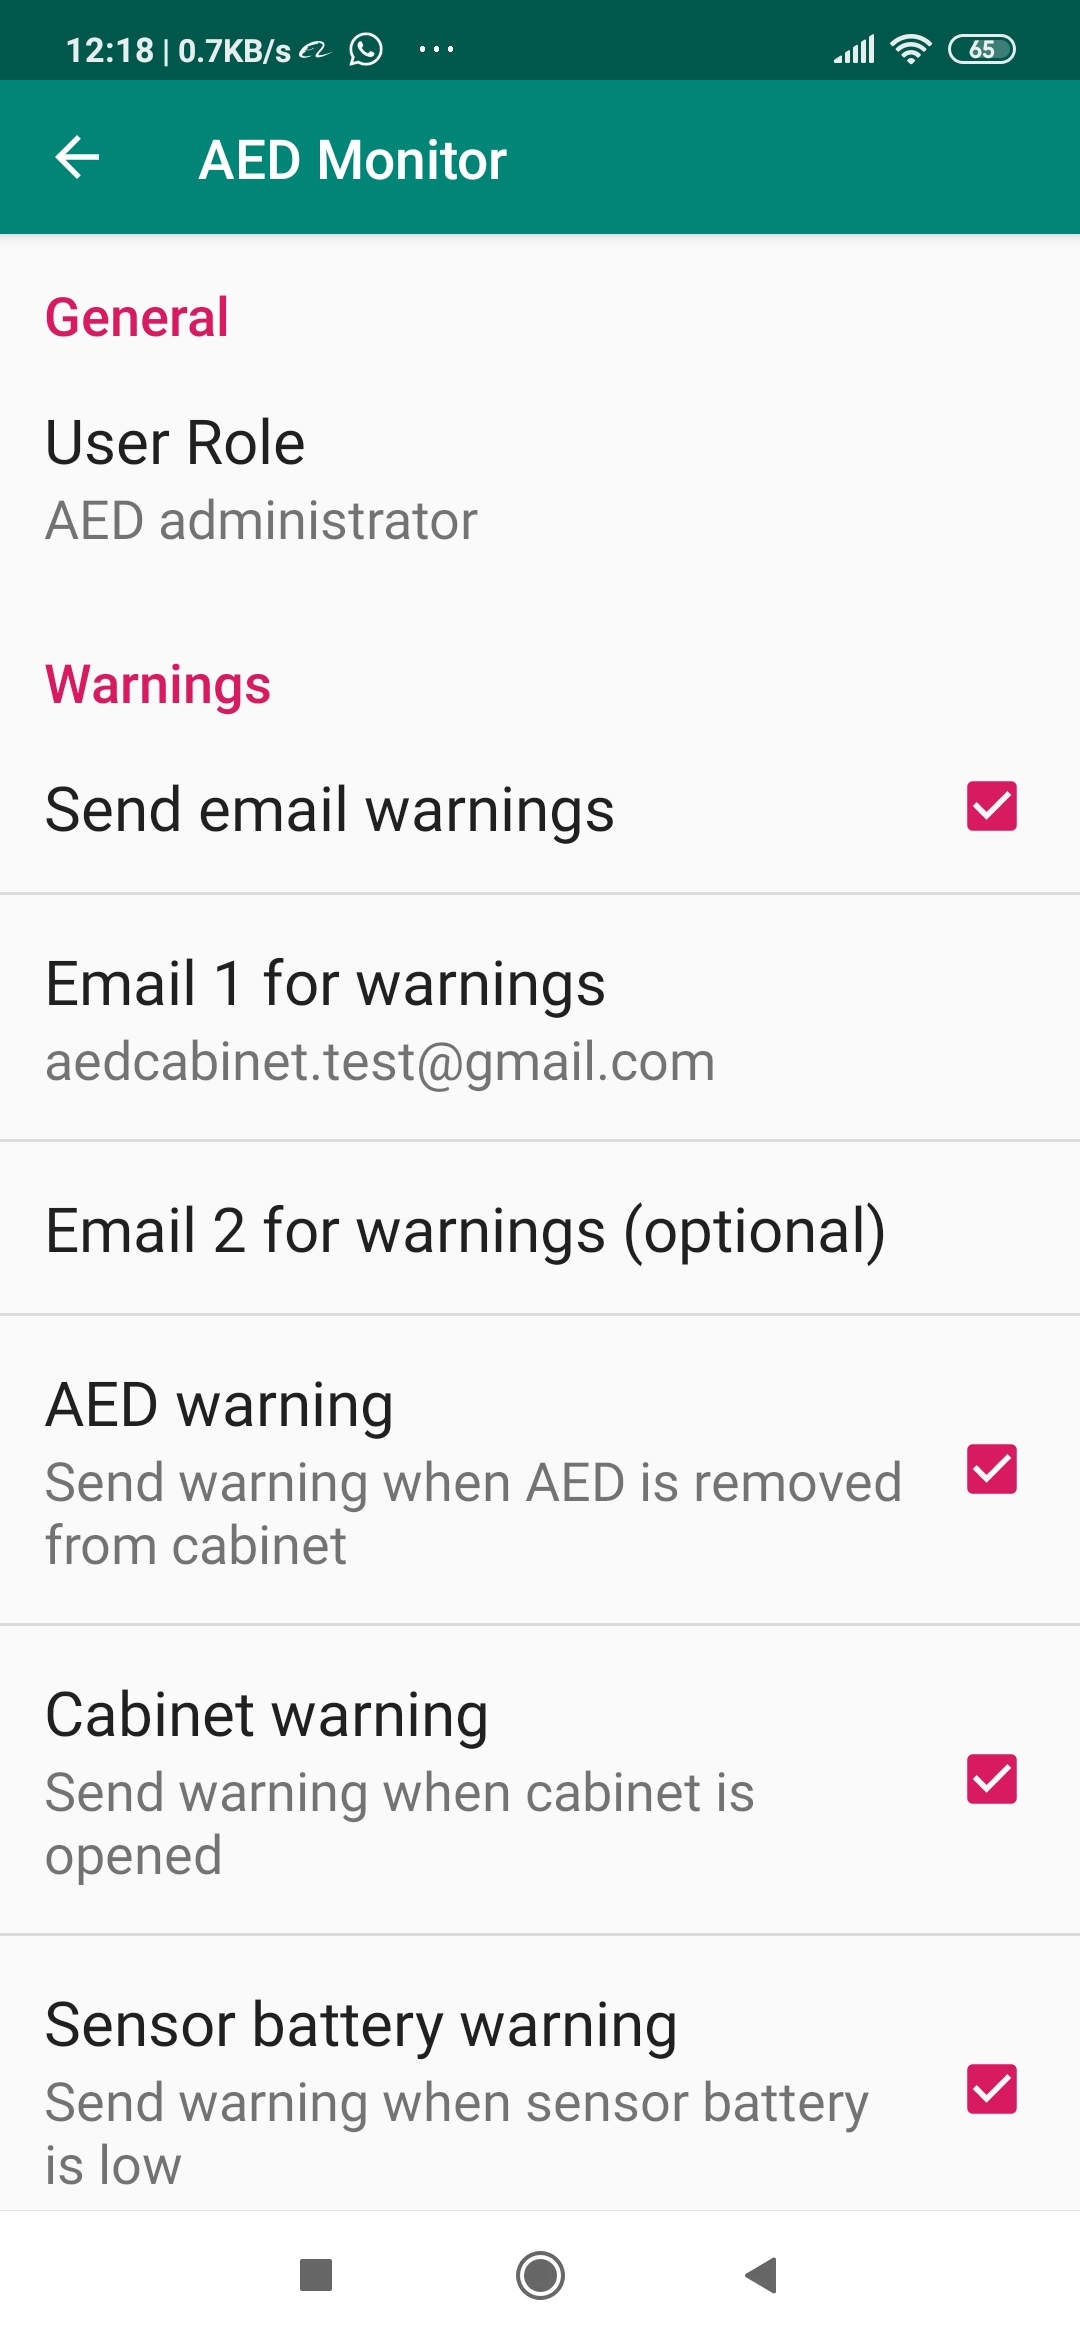
User Role
You can select 3 types of user roles for yourself. See “Step 2: register as a user”.
Send email warning
Here you can define if you want to receive the warnings also by email.
You can define 2 email addresses to send the warnings to.
You will always receive the warnings messages by app notifications (if not explicitely turned of: see following settings)
AED warning
If you deselect this option (checkbox to the right), you will no longer receive messages when the AED is removed from the cabinet
Cabinet warning
If you deselect this option (checkbox to the right), you will no longer receive messages when the cabinet has been opened
Sensor battery warning
This option is only relevant when a battery operated device is used.
If you deselect this option (checkbox to the right), you will no longer receive messages when the battery of the WIFI device/sensor is low.
It is strongly advised to leave this warning on.
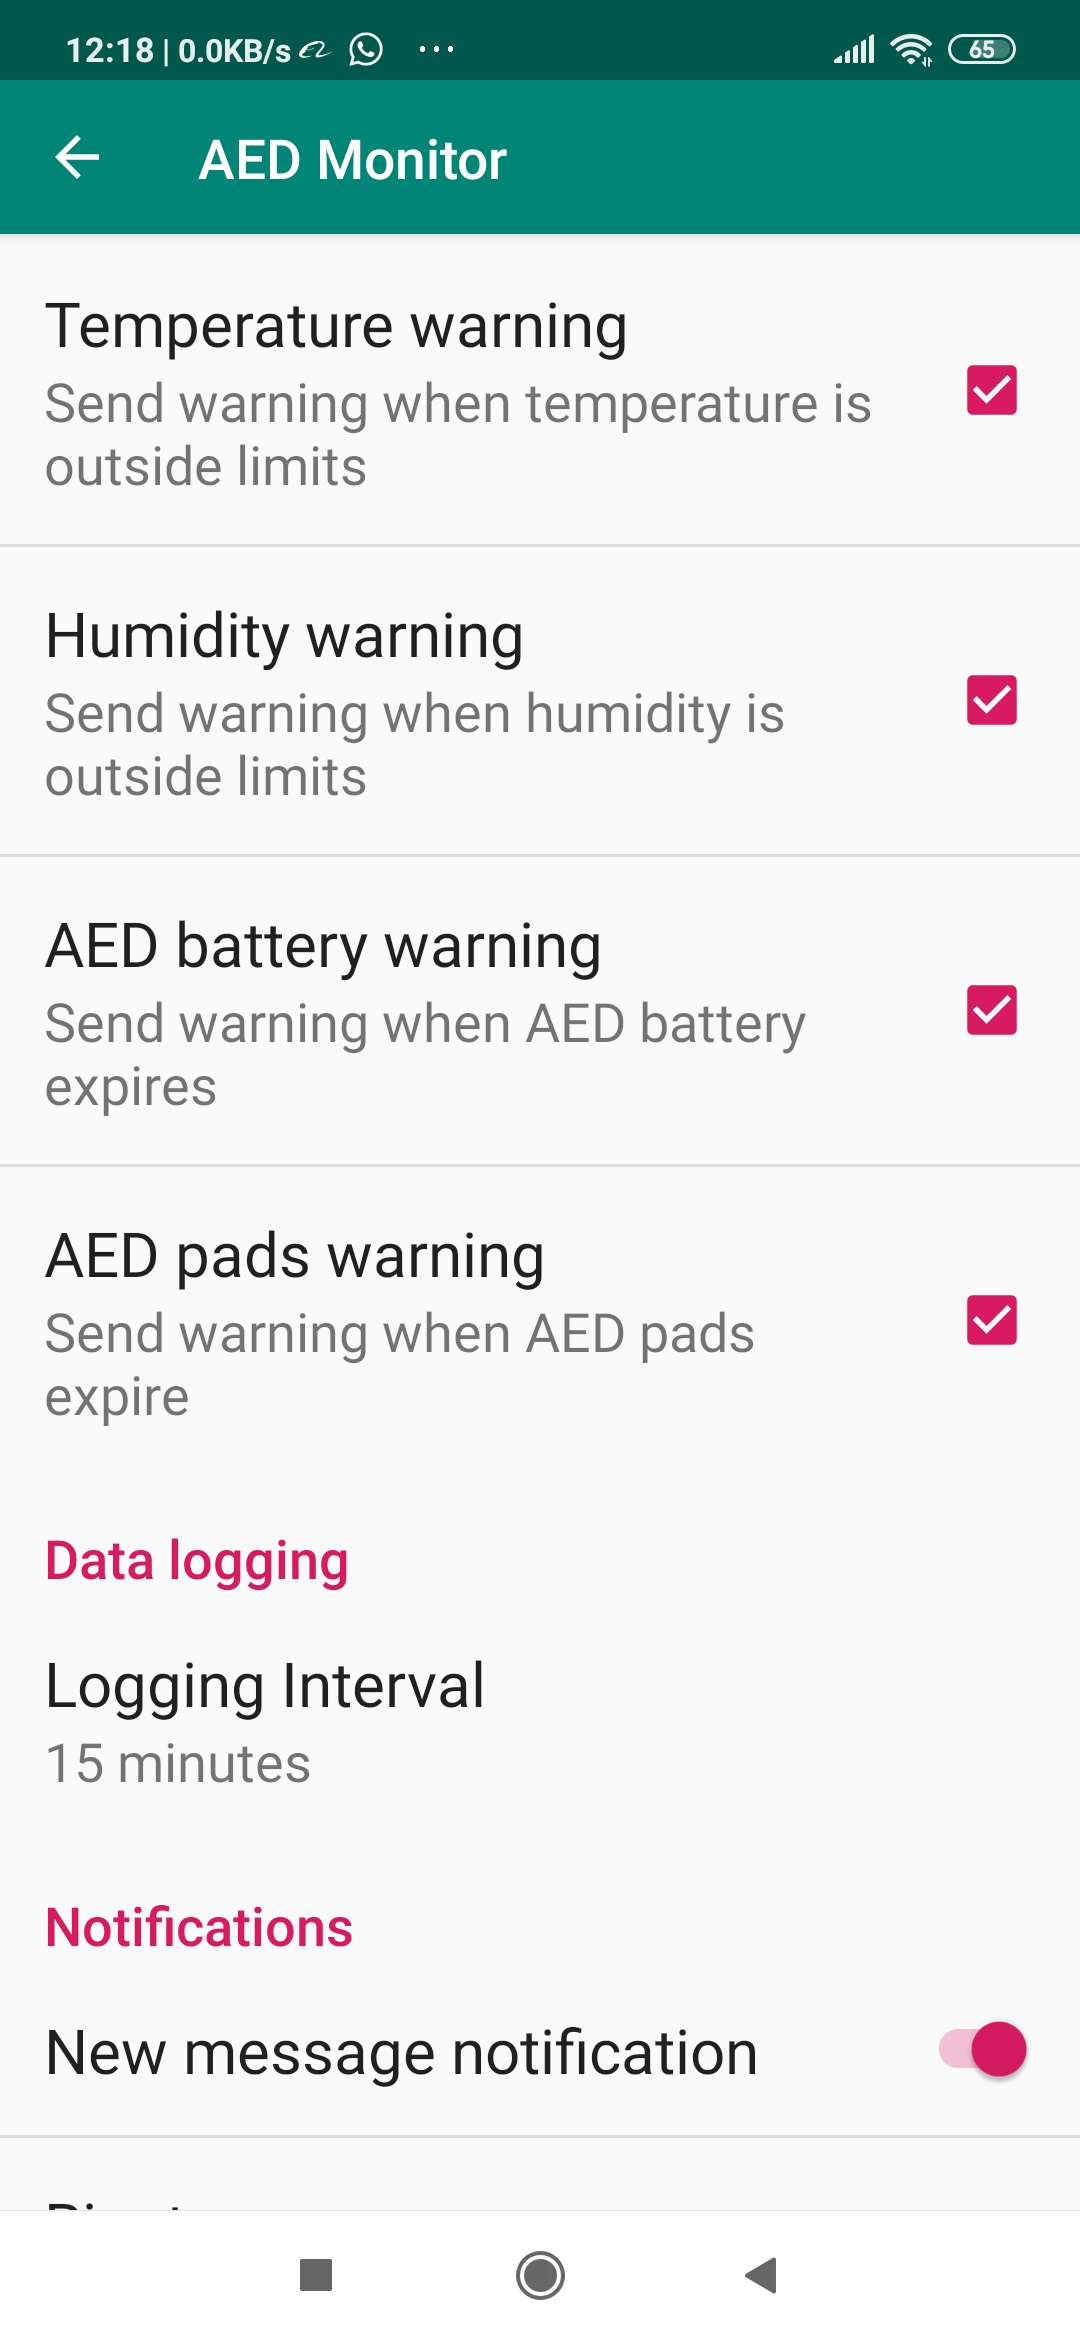
Temperature warning
If you deselect this option (checkbox to the right), you will no longer receive messages when the temperature inside the cabinet is outside the required storage limits of the AED. We advise to leave this warning on, so you can take appropriate action to protect the AED and assure its operation when it is required.
Humidity warning
If you deselect this option (checkbox to the right), you will no longer receive messages when the humidity inside the cabinet is too high for the storage limit of the AED. We advise to leave this warning on, so you can take appropriate action to protect the AED and assure its operation when it is required.
AED battery warning
If you deselect this option (checkbox to the right), you will no longer receive messages when the AED battery has expired. If you are using an alternative maintenance tool to assure timely replacement of the AED battery, you can deselect this option. Otherwise, we advise to leave this warning on and fill in the correct expiration dates in the “AED details”.
AED pads warning
If you deselect this option (checkbox to the right), you will no longer receive messages when the AED pads have expired. If you are using an alternative maintenance tool to assure timely replacement of the AED pads, you can deselect this option. Otherwise, we advise to leave this warning on and fill in the correct expiration dates in the “AED details”.
Logging interval
Here, you can modify the time interval for data logging.
You can select the following time intervals: 5 minutes, 15 minutes, 30 minutes and 60 minutes.
The default logging interval is 15 minutes for a 24V powered device and 30 minutes for a battery operated device.
This is sufficient to monitor the data and with this setting, the batteries of the WIFI device will last 1 to 2 years.
If you select 5 minutes or 15 minutes, the battery life will reduce significantly (2 -5 months and 6-10 months respectively).
If you decide to use short logging intervals, we advise to do this for a short time period and only for the AED that you would like to follow more closely.
Changing preference for an individual AED
This works exactly the same as for the previous section, except that the menu must be selected from the screen “AED details” by swiping from the left edge of the phone to the right or selecting the menu icon in the left top corner.
In this case, any changes to the preferences will only apply to the AED for which the “AED details” have been selected.
From thereon, you can follow the same steps as in the previous section.
Appendix A: setting up the GSM WiFi router
If you have purchased the USB GSM/WiFi router with the AED monitoring device, you can set it up as described here. You can also consult the manufacturer's manual which is included in the delivery. If you have an alternative GSM/WiFi router, please read the manufacturer's manual for correct settings. (APN, passwords etc.)
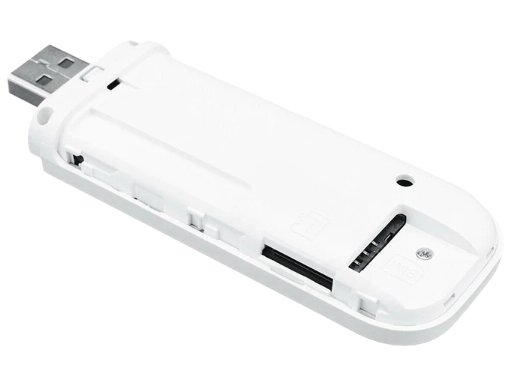
Open the plastic cover and insert the sim card in the sim card holder. Insert the router in a PC USB port and install the manufacturer's software. This software is on the modem memory and normally installs automatically (see also modem manual). Create a new user profile and insert the correct APN setting. This setting depends on the SIM card provider (please consult the web site of your provider for the correct data). Remove any pincode from the SIM card. Press on "connect" to connect the modem to the internet. After succesfull connection to internet, go to "Setting" and then "Mode" and switch to WiFi mode. Now you are ready to insert the modem into the USB port of the AED monitor device
Appendix B: Trouble Shooting
The AED monitoring device has no power
You can see this by checking the magnetic connector of the sensor.
If there is no blue led at the connector (and the connector is properly inserted into the USB of the AED monitoring device), the power is of.
Check if the adapter is connected to mains and to the cabinet cable.
Please check the connection from the main board to the AED monitoring add-on board. This is a small orange connector.
If it is loose, please reconnect the board.
My GSM router cannot connect to the internet
Make sure you have removed any pincode from the SIM card.
I cannot see the SSID of the AED device in the WiFi settings of my phone
This can happen if you wait too long after power up of the device.
Reset the the device by pressing on the reset button.
The SSID should become visible (if the device is not yet registered before).
If this does not help, press the "clr" button and the reset button at the same time (keep the clr button pressed for about 1 second when you release the reset button).
This will completely reset the AED Monitoring device.
I can't see my AED on the AED Monitor app
Please register your AED manually as described in method 2 under step 4.
I didn't get a confirmation email after signing up
Check you "Spam" folder of your email box
If you still can't find the confirmation email, please start the sign-up process again